1954 Dodge Power Wagon

1954 Dodge Power Wagon
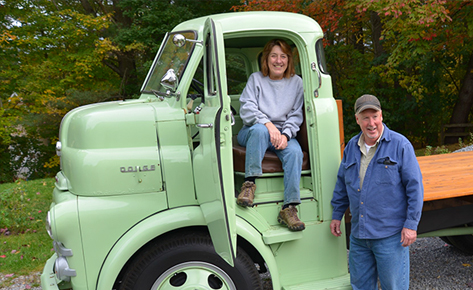
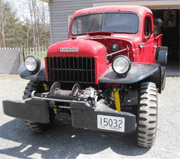
In the fall of 2006 I acquired a 1954 Dodge Power Wagon truck while out driving the back roads of Vermont, route 109 to be exact. A rusty old truck next to the road caught my eye. The owner happened to be mowing his lawn so I stopped . I must have been blinded by the Rust Flu for I could not see how much work this truck really needed. I seemed to miss the broken frame and the fact that two cylinder walls were cracked. The head to the 230 ci motor was resting on the front seat. Someone had cut the last two inches off the bed with a torch. Inhabitants plagued the cab like a condo running amuck, five mouse nests, two bees nest and a dead snake, biohazard site for sure. The nests rotted out the wiper cowl area and lower doors. This old wood truck had its share of running into objects, bed sides bowed out no doubt from being overloaded. Previous owners must have been amateurs at throwing wood and used the back of the cab as a backboard. The Rust Flu was hard at work, swaying any rational thought, letting passion and desire overrun common sense. Gazing googly eyed into pitted headlight buckets. Trying to justify the legitimacy of restoration or delegate the vehicle to mere parts car status.

Why a Power Wagon? Just a work truck, a tractor with a cab, born out of the World War II WC trucks. My interest in vehicles isn’t just the flow of the lines, blending of panels, 50 shades of gray, horsepower, and chrome bumpers, its the history of the vehicle, stories, development and researching parts manuals and shop manuals. This truck was legendary for its toughness and durability like the men who used it. From combat to farms both environments demanding, it answered the call. Restoration started with disassembly, the endless labeling & bagging. The parts list continued to grow. While tracking down parts, I met some great people and contacts, this is the other joy of our hobby. The down side is the endless sandblasting and expense. Many restorations fail at this point and keeping the spark and drive alive can be tough. I stayed involved by attending rallies and online forums, gaining knowledge I needed for the restoration. Each vehicle has its unique quirks, you know what I mean. Before the Shelburne show I had only driven a Power Wagon once before, an M37 military equivalent, it had a synchromesh transmission and mine doesn’t. It left an impression of crude but purpose built machine, rugged and overbuilt. I was hooked. Hooked enough to endure 10 years worth of, on and off again restoration effort. I kept pecking away at it. Locating a good frame, salvageable block and a lot of bed pieces. A tough process for a vehicle that the aftermarket reproduction companies tend to ignore because there isn’t a healthy profit in it. I was use to Mustangs, parts available anytime, anywhere and reasonably priced,…. Down to every nut and bolt. I found Power Wagons have a true and devoted following. Make a few connections and used parts and advice can be found. So I set monthly goals, little tasks and kept working at it. March of 2015 I had the bed done, April wiring and May the brakes. The Shelburne Show was the maiden voyage with the truck, still not complete, but I attained the goal. I do all my own work except for a few select things, I’ll be the first to admit “jack of all trades master of none”. It’s a battle when everything is twice as heavy and damaged. The old truck was well received and many nice comments. People stopped to tell stories of their Dodge experiences. Timber handlers, farmers, uncles, dads and Veterans all had something to say about a Power Wagon, invoking memories of the past. Listening to the stories only added to the event. Now, if I could only manage more than 35 mph, or as I like to say” I can go anywhere in the world at 30MPH……… VIVA LA POWERWAGON…

Fender Unbender – Dave’s Garage

subaru fender benderRecently my wife was driving the kids to school in the Subaru when the truck in front of her stopped. She didn’t. The impact smashed the left headlight assembly, and bent the hood, fender and radiator support. The headlight also contains the directional and running lamp. The hood was bent enough to separate the skin from the frame.

I estimated the damage would be about $1,500 if I took it to a body shop. I have a thousand dollar deductible, so this repair would cost me at least $500.

I also knew a new headlamp assembly, new hood, new fender and fresh paint would not match the rest of the car. The car is a 2002 with 234,000 miles on it. The shiny new headlight would not match the one on the right side, the paint would not match and the finish would not have the same “patina” as the rest of the car. The quote for a used hood from the salvage yard was $50, and the fender was $35. Unfortunately, they did not have any red ones.

A new headlamp assembly from Subaru is about $350. One from a salvage yard was $35. I bent the metal behind the headlamp assembly back in to shape, and used a hammer and dolly on the fender to achieve a good fit with the new headlamp. I pulled the hood frame back in to shape, and hammered the hood skin back to shape. I wire brushed the metal until it was clean, then I epoxy primed the bare metal. I hammered the hood skin back over the frame and finished hammering the shape until the fit was satisfactory.

I will continue to look for a used hood and fender. If I can not find them used, I will put a light skim coat of body filler on the fender and hood, and repaint them. I will have to clear-coat the entire hood and fender. Unfortunately, the price of the primer, sealer, red paint, reducer, hardener, and clear-coat will be more than the used panels, and I know the paint won’t match. In the meantime, the car is roadworthy again, and I have only spent $35.


Please email all inquiries to: Dave
or snail mail
32 Turkey Hill Road
Richmond VT 05477


Cabin Air Filter – Dave’s Garage

Most cars sold today have a cabin air filter, usually located behind the glovebox in the dashboard. This will filter dust, pollen and dirt entering the Heating, Air Conditioning and Ventilation System.

cabin air filterI recently noticed the airflow on my Subaru’s heater was weak on one of the many below zero mornings. I remembered this car had a cabin air filter, and I know I have never replaced it. The owners manual states the filter should be replaced annually, or every 15 thousand miles, depending on the conditions the car is driven in. This car has 230,000 miles on it, and this was the factory cabin filter, I had never changed it. I live on a very dusty dirt road, so I should theoretically be changing the filter more often.

The filter was inexpensive enough, and in stock at my local friendly auto parts store. When I took the old filter out, I was not surprised to find the filter was quite dirty. I was surprised to find a great deal of dirt and pine needles sandwiched between the A/C evaporator and the filter. I pulled out about a cup of dirt, and a handful of pine needles.

I used a vacuum cleaner to vacuum out the HVAC box, and a paint brush to get all the dirt off the A/C evaporator. I turned the heater fan on high to blow out any remaining dust, dirt and debris.

I was very impressed with the improvement in the airflow with the new filter. The volume of air going through the cars vents was noticeably higher.

The heater works much better now.

Cabin air filters in cars are a relatively new phenomenon. As cars have become more and more maintenance free, it is a bit unusual to have something new to remember to maintain. If the new filter does not include a sticker to log the date and the mileage of the replacement, it is a good idea to log this information on a piece of masking tape and place it somewhere on the car as a maintenance reminder.


Please email all inquiries to: Dave
or snail mail
32 Turkey Hill Road
Richmond VT 05477

Aah, I’ve Found the Problem, I Think – Dave’s Garage

Have you ever tried to fix something, had that Eureka! Moment and found a problem that would explain why it did not work, then fixed the problem only to find out that was not the problem after all? You put it back together, confident you finally fixed it, only to see the same problem return. Sure, it worked better, but it still has a problem. Ugh!

I was noticing that my tractor was occasionally not running correctly. I thought I heard the tell tale sound of a head gasket leak several times. I checked the torque of the heads, and sure enough, some of the head bolts were slightly tighter than finger tight. I re-torqued the head bolts and the noise was gone. This, I thought, may explain why the tractor did not always run well under a load. I confidently used the tractor thinking the problem was gone. The noise was gone, and it did run better, but, the same problem of stumbling under a load returned.

In a modern engine, the on board diagnostic computer will pinpoint problems. With a scan tool, a technician can read trouble codes, live data from sensors and use software to direct them to the specific problem. With older equipment, problem solving requires some real problem solving skills.

An internal combustion engine needs compression, fuel and spark to run. As simple as it sounds, there is plenty that can go wrong and cause poor performance.

I went back to trying to diagnose the problem with my tractor. I checked the compression, and it was exactly what it should be for an engine in good mechanical condition.

I suspected the condenser was the problem. After a recent snow storm I tried to snow blow the driveway with the tractor. It stumbled and had very little power. I checked the carburetor and found it was in need of a cleaning. The condition of the carburetor was enough to justify the poor performance of the tractor. While I had the carburetor apart I also pulled the points and condenser and inspected them. The points were very pitted and corroded. I was actually a bit surprised the engine could run with the points as corroded as they were. The condenser did not have the right resistance, so it too was faulty.

When the tune up was done the tractor ran much better, had more power and idled smoothly. The carburetor, points and the con-denser each could have caused the poor performance of the engine. So, what was the main problem? I will never know.

Editor’s notes… Funny the subject of tractors comes up. The one I have had for 16 years recently had a starter problem. After tearing it apart and experimenting several times I went back to it’s home where I bought it in Canada for some advice. When that advice didn’t work out I visited an American dealer for advice… and two more tear-downs later, still no go. I have given up and a re-manufactured unit is on it’s way from mid-west, USA. By now I don’t care if I know the problem, I just want to cut wood and remove a foot of driveway snow. Your right Dave… Ugh!


Please email all inquiries to: Dave
or snail mail
32 Turkey Hill Road
Richmond VT 05477

Frozen Piston Rings – Dave’s Garage

A little over a year my Chrysler minivan burned an exhaust valve. While diagnosing the problem, I did a compression check. All the cylinders had roughly 175 psi of compression, except cylinder six which had zero.

After replacing the burned valve, I checked the compression again, and found this cylinder only had about 70 psi. The engine had an uneven idle and a bit of a skip under acceleration. I decided to leave it for a while and see what happened.

I checked the compression again last weekend, and it was still only 70 psi. Remembering that there was no appreciable wear on the cylinder walls, I realized that the cause of the low compression was either broken rings, or frozen rings.

I knew the fix for broken rings would involve a tear down of the engine. Knowing that Marvel Mystery Oil is the “go to” fix for a frozen engine, I decided to try something that may fix frozen rings that would not involve tearing the engine down. I poured a mixture of 50% Marvel Mystery Oil and 50% Acetone through the spark plug hole, and left it overnight. The next morning I turned the engine over a few times to expel the fluid, then I checked the compression. To my relief, the compression was up to 150 psi. This is still lower than the other cylinders, but more than double what it was. The rough idle and skip are gone. I will drive the van for a few weeks and check the compression again.

This fix is much cheaper, faster and easier than removing the head, dropping the oil pan and removing the piston to mechanically free up the rings.

A 50/50 mix of ATF and Acetone is still my go to concoction for freeing up frozen hardware. The fluid is much thinner than conven-tional penetrating oil. I am still amazed at how well this works, and I almost feel like I am somehow cheating. It works so much better than anything else I’ve used, and it is much, much cheaper too.

Because Acetone is a solvent, this concoction needs to be kept in a sealed metal container. I have a metal oil can with a screw on cap on the end of the flexible tube.


Please email all inquiries to: Dave
or snail mail
32 Turkey Hill Road
Richmond VT 05477

My Tool Boxes – Dave’s Garage

toolbox
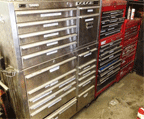
This month, I am talking about my tool box, or rather, my tool boxes. I have three tool boxes, lined up to each other side by side. On the farthest right side I have my first tool box. It is an inexpensive Craftsman tool box that I have had since I was a young teenager. For years this sat next to my work bench. Whatever did not fit in this box or the drawers of my work bench was hung up on the garage walls. This tool box now holds tools that I seldom use. These tools include things like my air conditioning tools, brake tools, and engine rebuilding tools. Some tools sit in this tool box for a year or more with no use.

The tool box in the middle is a better grade Craftsman tool box that was a hand-me-down from my father-in-law. This tool box holds tools like hammers, files, my 3/4″ socket set, clamps, pliers, drill bits, tin snips, my tap and die set and measuring equipment.

The tool box on the far left is a professional grade stainless steel toolbox. This tool box came from Costco about 15 years ago. This tool box has the tools I use the most, tools like wrenches, ratchets, spring compressors, pullers, dwell meter, tune up tools, and test equipment. The tools that are used the most are in the upper drawers, with lesser used tools in the drawers below. I have mounted badges from cars long gone to my tool box as a way to personalize it.

I am rather partial to quality hand tools. These are the tools that are part of the physical connection between us and our car hobby. The wrenches we hold in our hand to work on our car are a tangible connection to our vehicle, something we spend a great deal of time physically holding in our hands.

wrenchI purchased my first set of fully polished wrenches almost 20 years ago. These wrenches are very comfortable to hold, and very rewarding to use. The box end of the wrench does not simply grab the corners of nuts and bolts, but, rather also grabs them on the flats too. In addition to being very comfortable to use, these wrenches grip fasteners very well, greatly reducing the possibility of the wrench slipping and stripping the head of the fastener. I have been told that Snap-on pioneered and patented this idea, but the patents have expired. The box end of these wrenches is very small, allowing them to fit in to tight places. These wrenches are also very light weight, making them much easier to use. When I finish with a job, I always wipe my tools down with a rag before I put them away. Traditional drop forged satin finished wrenches are very hard to keep clean. Fully polished wrenches come clean with a quick wipe. Sometimes it is necessary to give them a quick wipe with a rag dipped in Kerosene. Either way, they come clean easily.

Having the right wrench is important. Sometimes only a short “stubby” wrench will fit; other times an off set wrench will do the trick. Sometimes there is no room for a socket wrench to fit, but a ratchet wrench will fit just fine. Working on tubing is almost impossible without a quality flare wrench. Soft fittings made out of aluminum or brass are very easy to strip. All of my SAE wrenches have their own drawer, as do all of my Metric and BSF (Whitworth) wrenches.

car mechanics toolbox
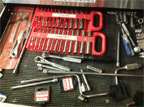
No toolbox should be without sockets too. I have both 6 point and 12 point sockets, in both standard and deep socket. I have these socket sets in Metric, SAE and BSF (British Whitworth). I have these sockets in 1/4″, 3/8″ and 1/2″. All of my 1/4″ sockets have their own drawer, as do my 3/8″, 1/2″ and 3/4″ sockets.

I also have an assortment of ratchets and extensions too. Wobble extensions are a necessity for hard to reach nuts and bolts. I have some dedicated pipes, or “cheater bars” too. I have a two foot pipe in my 1/2″ socket drawer, and a 5′ pipe next to the tool box.

Most of my hand tools are in cradles, so in addition to keeping them well organized I can pick them up and carry them over to whatever I am working on. This is very handy with both wrenches and sockets.

Most of my hand tools are Craftsman “professional” tools I have purchased significantly marked down on sale at Sears. Most of my BSF tools were made in India, they are very high quality but also relatively inexpensive. The tools I use less frequently are very inexpensive. I can’t justify (or afford) top quality tools that I only use a couple of times a year. My A/C vacuum pump is a $10 Harbor Freight pump. I bought a carbon pile battery load tester from Harbor Freight about 10 years ago. It looks a lot like the $500 Snap-On tool, but it only cost $30 with a coupon. It probably does not work as well as the Snap-on, but for the few times a year I use it works quite well.

auto mechanics toolbox
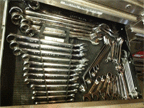
I have an assortment of specialty tools that I have purchased from auto parts stores, these were usually tools that I needed to finish a project.

The most important part of tool ownership is taking care of them. They can not work if they can’t be found easily. If they are not properly taken care of, they will not perform for you when you need them. If I need a hand in the shop, I can ask someone to get a tool for me. I know right where it is, and can give quick instructions to someone to retrieve it for me.

I never use a cheater pipe on a high quality ratchet. I have standard drop forged Craftsman ratchets for those jobs. If it breaks, it gets fixed or replaced for free. If it gets a ding in it, it won’t ruin my day. I never hit a high quality wrench with a hammer, I have a Harbor Freight set I use when I need to whack a wrench with a hammer.

I spend a lot of time with my tools, and enjoy using them. If properly taken care of, your tools will take good care of you and your projects.


Please email all inquiries to: Dave
or snail mail
32 Turkey Hill Road
Richmond VT 05477

Copper Nickel Brake Line – Dave’s Garage

Progress is great. When a product appears on the market that increases the safety, service life, ease of maintenance, and the performance of our cars, it is a good thing. Perhaps you may have noticed there is a new type of brake line on the market.

A little history- Before WWII, many manufacturers used copper brake lines. Copper is both easy to form, and resists corrosion well. Unfortunately, copper is also prone to cracking. Shortly before the war, there was a transition to steel tubing for brake lines. Steel did not have the cracking problem of copper, but it did corrode. Steel brake lines would often fail after only a few years of use. The options to prolong the life of steel brake lines included many types of coatings to protect against corrosion.

Steel brake lines failing due to corrosion was not acceptable to safety obsessed Sweden. Both Saab and Volvo experimented with epoxy coatings, anodized steel and various other coatings to protect the brake lines. Volvo introduced a new type of brake line in 1976. This new brake line consisted of 89% Copper, 1% Iron, and 10% Nickel. This alloy proved to be durable with the corrosion resistance of copper and the crack resistance of steel.

Years ago when doing repair work I found steel brake lines would only last a few years before they would fail due to corrosion. I used anodized brake line exclusively for the last ten years or so. This anodized line lasts much longer than bare steel line.

Copper-Nickel tubing is much easier to form than steel, resists kinking and virtually will not corrode. I have found that a tubing bender is useful, but not necessary to bend Copper-Nickel tubing.

Cutting and bubble flaring Copper-Nickel tubing is actually quite easy. As with steel tubing, it is imperative to start with a nice, clean square cut. Nothing but a sharp tubing cutter will do.

Make sure there are no burrs on the end of the tube, and that you have a nice clean cut. Like steel, it may be necessary to dress the cut tube with a fine file before flaring. Unlike steel, I have found it is NOT necessary to chamfer the fresh cut end of the tube before using the flaring tool.

copper-nickel brake line
Because the Copper-Nickel is softer than steel, I found I have to be more gentle with a bubble flare tool. It takes far less effort to drive the mandrel in to the tube, and to pinch the final flare. I also found that it works better to use a tad more material for the flare than with steel. When installing and tightening the flare nuts, I found it takes less effort to tighten the fittings with no leaks. The Copper-Nickel tubing has more “squish” than steel.

I recently replaced all of the brake lines on my Chrysler minivan. With the ABS pump, proportioning valve, duel circuits and the many transitions to rubber hose and back to metal, there were many individual lines to form and many fittings to flare. The Copper-Nickel was far easier to work with than steel would have been. When I finished the job, there were no leaks.

Copper-Nickel brake line is stocked at most auto parts stores, and the price is comparable to anodized steel tubing. Do yourself a favor and try some the next time you have to replace a brake line. You won’t be disappointed!


Please email all inquiries to: Dave
or snail mail
32 Turkey Hill Road
Richmond VT 05477

Trailer Tires – Dave’s Garage

Trailer tires have a tough life. Drivers are unlikely to feel any notable differences in road noise or road feel with trailer tires. Trailer tires are often subjected to harsh curb hits and road bumps. Tandem axle tires also experience harsh scrubbing due to making tight turns in parking lots and on corners.

trailer tiresTrailer tires are quite different from traditional passenger car and truck tires. Trailer tires are not designed for either tractive effort or steering adhesion. The tread design is not optimized for ride comfort or noise reduction. Most importantly, the side walls are designed to reduce trailer sway and provide optimum control.

The two biggest enemies to trailer tires are abrasion and heat. As trailer tires heat up, their structure begins to disintegrate and weaken. The load capacity gradually decreases as the heat and stress caused by higher speed increases.

As with any tire, trailer tires have a “shelf life.” Time weakens a trailer tire too. Three to five years is the projected life of a trailer tire. Obviously, the type of use and number of duty cycles influences the service life of the tire. Weight carried and speeds driven are the biggest factors influencing tire life. In approximately three years, roughly one-third of the tire’s strength is gone.

The mileage life of a trailer tire is generally 5,000 to 12,000 miles. Which tires should you use? Trailer tires should match each other, and the load rating should ex-ceed the combined weight of the trailer and load by about 20 percent.

What is a tire with a rating of “ST”?
“ST” tires feature materials and construction to meet the higher load requirements and demands of trailering. The polyester cords are bigger than they would be for a comparable “P” or “LT” tire.

The steel cords have a larger diameter and greater tensile strength to meet the additional load requirements. “ST” tire rubber compounds contain more chemicals to resist weather and ozone cracking.
Always inflate trailer tires to the maximum inflation indicated on the sidewall. Check inflation when the tires are cool.

If the tires are hot to the touch from operation, add three psi to the max inflation.

Under inflation is the number one cause of trailer tire failure. An under inflated tire will flex needlessly, and run much hotter than a fully inflated tire.

Keys to Avoiding Trouble from Carlisle tire

  • The ideal storage for trailer tires is in a cool, dark garage at maximum inflation.
  • Use tire covers to protect the tires from direct sunlight.
  • Place thin boards or plywood sections between the tire and the
    pavement.
  • Clean the tires using mild soap and water ONLY.
  • Do not use tire-care products containing alcohol or petroleum distillates.
  • Inspect the tires for any cuts, snags, bulges or punctures.
  • Check the inflation before towing and again before the return trip.
  • Replace trailer tires every three to five years, whether they look like they’re worn out or not.

Trailer Tire Warranty

  • The Carlisle trailer tire warranty applies to the original purchaser for three years from the date of purchase or until the tread depth reaches 3/32″.
  • The OE (original equipment) warranty goes into effect at the time of the trailer purchase

Please email all inquiries to: Dave
or snail mail
32 Turkey Hill Road
Richmond VT 05477


Brake Down – Dave’s Garage

Five or six years ago the Jaguar XKE started to run rough, cough, belch black smoke, and backfire. This problem got worse quickly and the car ran so poorly it could barely move. Life got in the way, and the Jag was parked.

jaguar xke brake cylinder
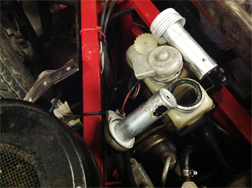
This summer I decided it was time to figure out what was wrong with the car and fix it. I found a sunken carburetor float in the rear carburetor, a torn diaphragm in the front carburetor, a bad fuel pump and a dead battery. Once I got these issues sorted out, I began to tune the car and get it running again. It soon became apparent that there was an issue with the brakes. Both front and rear brakes were dragging, and the pedal did not feel right. I know that the brake fluid has not been changed in at least 15 years. When I removed the caps to inspect the brake fluid, I found a nasty surprise. We all know that brake fluid absorbs moisture. Due to some spring flooding this year, the building the car was stored in, had several inches of standing water on the floor of the garage.

The brake fluid actually had standing water pooled on top, and the fluid was starting to congeal. The aluminum caps for the fluid also have low level switches in them. The aluminum had rotted away, and the caps fell apart in my hands. I used a turkey baster to remove the fluid, then flushed fresh new fluid through the system and out the bleeder screws. It is amazing how corrosive contaminated brake fluid is. Look at these pictures. This damage could have been avoided if the fluid had been changed every two or three years.

An extra Tip……… I was recently shopping at Tractor Supply, and I bought a new battery cable for my tractor. When I installed the new cable, I noticed the diameter of the cable was much thicker than the one it was replacing. I realized that the cable I bought was suitable for a six volt battery. A six volt battery cable needs to be thicker, because it carries more amperage at a lower voltage. Six volt battery cables are hard to find at an auto parts store, but Tractor Supply has a large selection in stock.

Please email all inquiries to: Dave
or snail mail
32 Turkey Hill Road
Richmond VT 05477

Water Pump Grease – Dave’s Garage

A lot of our antique cars have, or had a grease fitting or a grease cup on the water pump. Without the proper grease, the water pump bearings will quickly fail. In some cars, particularly Model A Fords, the grease may pass through the water pump in to the cooling system. Ford specified a special water soluble grease. Using a conventional grease can cause a blockage in the radiator. Chrysler specified a special grease for use on their water pumps too.

water pump
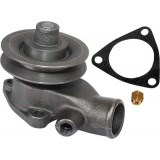
So, what makes water pump grease different than conventional chassis grease? Depending on the grease, it is either a grease that won’t be washed away by water, or a water soluble grease that will wash away and dissolve in water preventing a blockage in the cooling system.

Many replacement or rebuilt water pumps have modern, sealed bearings. Most of these pumps use the original casting and either have a grease fitting, or grease cup, or a spot for the grease fitting to be fitted. Many concourse restoration pumps actually have dummy grease fittings or grease cups to “look the part” of the factory pump.

The question is, what grease to use? If you need a water soluble grease, such as for a Model A, most Model A parts- houses stock the water soluble water pump grease.

There are several options for non water soluble grease. Most auto parts stores stopped stocking water pump grease decades ago. The most popular modern replacement is marine grease, or the wheel bearing grease for boat trailers. Many people use Lubriplate 115 for water pump grease. Marine shops carry outboard motor grease. Another option is your local fire department. The pumps in fire trucks requires a special, water pump grease. This grease is sitting right on the shelf at the fire house. If you are lucky, they may give you a few pumps from their grease gun, or several ounces from the tub they are using.


Please email all inquiries to: Dave
or snail mail
32 Turkey Hill Road
Richmond VT 05477