Synthetic Oil

Hey Dave’s Garage-

What is synthetic motor oil all about? Why is it better than natural oil? How does it differ chemically? I always thought that frequent oil changes were necessary because of the build up of acid and other contaminants. Why don’t they build up in synthetic oil the same way? Wendell Noble

Wendell, great question! There is a lot of information, and a lot of strong opinion here.

There are three types of engine oil sold in the U.S. that are considered “Synthetic”.

synthetic oilGroup III synthetics are oils based upon hydrocracked crude oil. They have many qualities of “true” synthetic oils, but they are not manufactured or “synthesized” in a lab. They are refined from crude oil.

Group IV synthetics are produced from Polyalphaolefin base stocks, and are one of the two “true” synthetic oils available in the US.

Polyalphaolefin (PAO) is a manufactured ethylene chemical used to manufacture many plastics and fabrics. It also can have good properties as a lubricant. Pure PAO alone does not work well as an engine oil. It still needs additives to work as an engine oil.

Group V synthetics are almost exclusively ester based. Like PAO based lubricants, group V base oil needs additives to be an engine oil. Group V based oils are very specific application lubricants. I don’t believe they’re used as a base in over the counter synthetic engine oil.

So, so called group III synthetics are a more highly refined crude oil, with a base stock that comes out of the ground as crude oil.

Group IV synthetics are synthesized from Polyalphaolefin (PAO).

The benefit of a true synthetic is uniformity and consistency in the molecular make up of the base oil. Unlike refined crude oil, synthetic oil has consistent molecular chains. Think of crushed gravel being ground up to similar sized pieces (conventional oil), and compare that to manufactured glass marbles (Synthetic). The marbles are more consistent in size and shape. The marbles would make a better lubricant.

Cost may be the best way to determine if oil is a true synthetic. If it is under $5.00 a quart, it is probably a group III synthetic. The true answer can be found on the bottle or the manufacture’s website.

Regardless of the base lubricant, all engine oils have additives to control viscosity through temperature ranges, and additives to keep the engine clean and well lubricated. These additives still wear out or break down regardless of the base oil used. Engine oil is also diluted with by-products of combustion through use.

So why use synthetics? Synthetic oil is a superior lubricant. The oil is consistent on a molecular level, with no impurities. Refined oil has inconsistent molecular chains and still retains trace amounts of impurities. Synthetic oil maintains viscosity regardless of temperature. Put a quart of conventional oil and a quart of true synthetic in your freezer overnight. In the morning take them out and shake them. The synthetic will still be fluid. The conventional oil will be thick like honey. Remember that next winter when it is below zero and you start your car.

Synthetic oil does not sludge and varnish in the engine as conventional oils do. I have opened up engines with over 200,000 miles on them with synthetic oil, and they look like new inside.

Oil change intervals should still be dependent on driving conditions. Short distance driving is “severe” duty. It is often a good idea to do a Used Oil Analysis to get an idea of when to change your oil. A UOA may show your used oil did not need to be changed, and was still able to properly lubricate. You may find a vehicle with synthetic oil, with few short trips can go 10,000 miles or more before the oil needs to be changed.

From the Editor…. Dave, would you please keep this oil discussion going?

Questions….. Should we use synthetic in our old cars? What about the question of single-weight oil vs multi-weight oils in our old cars, which is best and why? You have mentioned the moisture collecting in our car’s oil pans, especially during winter storage, should oil types come into the conversation here? What about this whole question of 600 weight in our old differentials? What should we use and is 600 weight really 600 weight? Thanks Dave.

Tank Ooze

gas tank ooze
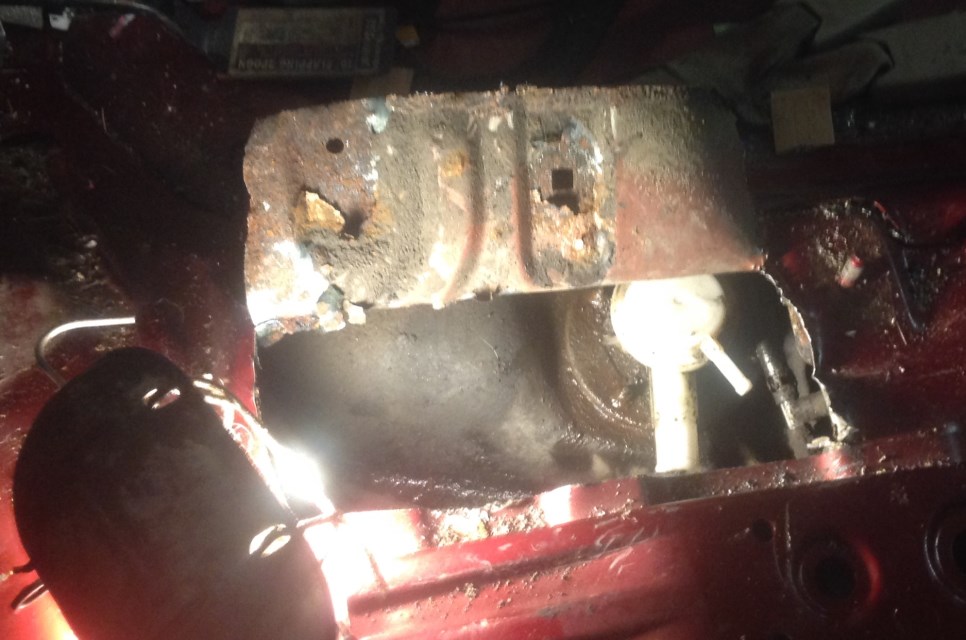
Absent any questions this month, I will share something interesting with you. Recently I drained and removed the gas tank on the Datsun 240Z project. This car was parked in 1982. I removed the drain plug, but no gas came out. I poked at the hole with a screwdriver, and felt a thick tar like substance. I poked through it and very dark, varnished gas began to dribble out.

After removing the gas tank, I stood it up on end. About a gallon of thick, black asphalt like substance oozed out the filler neck.

I googled it, and learned that gasoline literally turns back in to crude oil after sitting for a long time. After 35 years, it does not resemble gasoline anymore.

Project Updates – MGB & Datsun 240Z

Absent any questions this month, I will give a brief update on the projects I am working on. The MGB project is progressing nicely. The front suspension has been rebuilt. All the metal parts have been wire brushed, cleaned and painted. The cast parts were painted with a coat of “cast blast” lacquer to replicate the look of clean cast iron. The steel pieces (brake dust shield, lower A arm and all hardware) were painted with POR black paint. This will provide a durable and long lasting paint protection.

1972 Datsun 240Z
The ’72 Datsun 240Z “Gift-wrapped”

The entire brake system has been overhauled. Many metal lines were replaced with Nickle-Copper lines, affording an opportunity to learn how to shape hard lines and how to create bubble and double bubble flares. All the rubber hoses were replaced. The calipers and master cylinders were rebuilt, and the shoes, pads and rear wheel cylinders were replaced. Brakes were adjusted and the wheel bearings were repacked with new grease seals.

The generator, distributor and carburetor were rebuilt. Last week the car was started, the first time it has run in 30 years. We let a mixture of ATF and Acetone soak in the cylinders for some time before we changed the oil. The engine turned over easily. The engine started right up, however, some of the valves were sticking. We let it run for about 20 minutes, then slowly poured seafoam into the carburetors. This week we will set the ignition timing, and adjust the carbs and the valves. We will also set the front wheel toe-in alignment using two parallel strings strung through the axle center line and a dial caliper. We will move on to the rocker panels and the floor pan replacement.

I have another project in the garage, my son bought a 1972 Datsun 240Z. This car has rust in the usual places. It is getting new rocker panels, floor pans and rear quarter panels. Fortunately, the car came with all the body panels. This car will be a father/son restoration project. The car is solid enough, but will probably end up being a full ground up rotisserie restoration.

The driver’s side floor and rocker panel have been replaced. Most of the rust repair on the left side has been completed. After the rear quarter panel is done we will test fit the front fender and the door, adjust all the gaps, then move on to the right side. Once all the welding is complete, the engine, transmission, front and rear sub frames, the front and rear suspensions and the rest of the interior, will be removed. The car will go on the rotisserie for all the body work and final painting. Stay tuned…

MG Update

I have not received any questions this month, so I will give an update on the MGB project I am helping the high school student with.

When we adjusted the valves, I was able to use my camera scope and explain how a four cycle engine works. The principle of the carburetor operation was easy to understand while rebuilding the carburetors.

I have taught her how to rebuild the brake master cylinder, the brake calipers, and the clutch master. I have taught her how to cut and form metal brake lines, make bubble flares with a flaring tool, replace brake pads and brake shoes, and how to adjust drum brakes.

Together we replaced the kingpins in the front suspension. Taking the suspension apart, I was able to show her how the suspension worked. She got hands on experience disassembling, rebuilding and then reassembling the suspension.

We disassembled the generator, soaked the bronze bushing in engine oil, dressed the armature, replaced the brushes, cleaned, paint-ed and reassembled it. We polarized it, then tested it before installing it back on the car.

More hands on experience was to be had when I walked her through how to replace the wheel bearings. She was able to knock out the old bearing cones and install the new ones. This was followed up with packing the bearings and installing new grease seals.

We even successfully banged out a good size fender dent. We may weld in new floor pans and rocker panels.

I am so impressed with how quickly she is able to learn new skills, and master these tasks. All through the project she is learning how to properly care for tools, and keep all the parts well sorted. We are carefully saving all of the old parts, and every work session ends with carefully wiping the tools down with a rag, then putting them away, clean.

The MGB is a great car to learn from. It is simple enough to use as a model for explaining and demonstrating how the systems of a car work, yet modern enough to be relevant.

We need to continue projects like this one to keep our youth invested in the hobby. In a few weeks this MG will be ready for her to drive it to school. Amazing, considering the car had been parked outside for years before she was born, and has sat idle her entire life.

mgb brake calipers

Yup, the calipers both looked like the one on the right, now they look like the one on the left. Cleaned, and new pistons, seals and dust seals.

All Lined Up (2)

Several months ago I received an email from a Vermont high school student through my MG club’s website. This high school senior ex-plained that to graduate from high school, the school required seniors to complete a senior project. This project required an adult to mentor them and guide them through the project.

The project is a 1964 MGB that has been parked in a wood shed for decades. The car was not put into storage, it was simply parked. To get the car running, all of the fluids needed to be changed, the front suspension needed to be overhauled, the carburetors needed to be rebuilt, the fuel pump and fuel lines needed to be replaced, the radiator and the water pump needed to be replaced, and the brakes needed a thorough overhaul.

I have assisted this high school student with the project for the last few months. The car is almost road worthy. The initial startup is only days away.

This project is very important to me for several reasons. It is very rare to find a high school student with an appreciation for auto-mobiles, and an interest in learning how they work and how to maintain them. I am enjoying the opportunity to teach a teenager how to maintain a car, and I am also glad to be returning another MG sports car…. back on the road.

The really nice part of this story? This high school student knows how to drive a standard, and she is a woman.

The picture below is one found by Wheel Tracks on line. What a beauty.

The car to the left might be like this someday.

How many of you would like to know more about this high school student and her plans for the future. Is she at one of Vermont’s Career Centers.

Maybe if we ask Dave ‘real nice’ he could ‘author’ something for us.

All Lined Up

About a year ago I replaced the steering rack in my minivan. That replacement rack blew out during the cold snap in December. The good news was the part was covered by the warranty. The bad news was after I replaced the rack, I needed to do a wheel alignment.

Since I had the alignment done a year ago, I knew the castor and camber were fine, I just needed to adjust the toe in. I was not willing to expend another hundred bucks for an alignment.

jack stands positioning
Correct jack stands positioning

I set up four jack stands in the garage at each corner of the van. I strung yellow carpet thread between the two left and the two right jack stands. I used carpet thread as it is strong, and thin. It gave me a very thin and straight reference point to take a measurement from. I was able to extend the jack stand, at exactly the same height as the center line of the axle (through the center of the wheel), giving me a reference line extending through the axle center line, from the front to the back of the vehicle. To ensure the left and right string lines were exactly parallel, I ensured the two front and two rear jack stands were exactly the same distance apart. I used the 3,4,5 rule to ensure the two rear jack stands formed a right triangle with one of the front jack stands. Three feet out on the base line from one rear jack stand to the other jack stand, four feet out from the rear jack stand toward the front jack stand, then the hypotenuse, connecting these two points was five feet.

wrong jack stands
Incorrect “jack stands”

I used a ratchet strap to hold the steering wheel exactly in the dead straight ahead position. I adjusted the tie rods to achieve a slight 1/16″ toe in on each front wheel, achieving an overall 1/8″ toe in. I checked the measurement between the edge of the rim and the string, with the front measurement being 1/16″ more than the rear.

Plan B

Several years ago I began getting a check engine light on my Subaru Outback. The code was being caused because the emissions self check determined there were unturned hydrocarbons, venting directly from the gas tank to the atmosphere, not through the char-coal canister as designed. This is often referred to as “the gas cap code”.

The light came on more frequently until several months ago when it remained lit all the time. A couple of weeks ago I pulled in to a gas station. The pump island was not level. The driver’s side of the car was several inches lower than the right side. As I topped off the tank I smelled gas, and saw gas dripping down from the tank. Ugh!

I put the car on the lift and found gas seeping from a plastic valve on the top of the tank. Now, Subaru was kind enough to put an access panel in the floor, under the rear seat, to access the fuel pump. They were also kind enough to place an access cover over the fuel sending unit. Servicing these two items is quite easy, and does not require dropping the tank. Unfortunately, there is no way to access this plastic valve without dropping the tank. The two access covers are very far from this plastic valve.

To remove the gas tank on this car, first the drive shaft, rear axle, rear suspension and the exhaust system needs to be removed. Then, the tank can be lowered. When pricing parts, I discovered the gas tank straps are no longer available from Subaru, and not yet available in the aftermarket.

I had a hard time justifying the time and expense to perform this task on a 14 year old car with 247,000 miles on it. If there was only a way to ac-cess the valve from inside the car, if only…

subaru gas tank removalWell, it took less than a minute to cut a hole in the floor with my saws-all. After the valve was replaced it took about ten minutes to weld the metal back the way it was. Interestingly, it looks like the valve failed because something dissolved the plastic, I believe it was ethanol. This was also a good time to coat the area with a liberal thick coat of Fluid Film.

With the valve replaced the threat of gas vapors was gravely reduced it was safe to weld. I was more than a little on edge welding so close to the gas tank. I placed a piece of sheet metal between the tank and the floor. I had two fire extinguishers and water on hand, just in case.

Yea, this was a hack job, but a very well done hack job.


Please email all inquiries to: Dave
or snail mail
32 Turkey Hill Road
Richmond VT 05477

A Universal Problem – Dave’s Garage

Many automobile manufacturers have been making drive shaft universal joints as a non- serviceable item. These universal joints are also sealed, with no grease fittings or provisions to grease the joint. When the joint eventually fails, (due to lack of lubrication) the entire drive shaft has to be replaced. These universal joints are held in the yokes with stakes, punched in with a press at the factory, and are therefore referred to as “staked in” U-joints. Ford, Chrysler, GM, Honda, Mazda, Nissan, Subaru, Toyota, Jaguar and BMW all have models utilizing staked in universal joints. The Mazda Miata and virtually all Subarus have those joints.

I recently noticed a vibration in my Subaru Outback. When I removed the driveshaft between the transmission and the rear axle both universal joints were binding, with rust powder falling out of the trunnion. Subaru has been using staked in universal joints for years. Subaru does not offer a replacement joint. According to Subaru, the drive shaft is not serviceable, and when a carrier bearing or a universal joint fails, the entire drive shaft assembly needs to be replaced. The cost for a replacement drive shaft is roughly $850. I was not about to purchase an $850 driveshaft because a $30 universal joint failed. Outside of the joints the driveshaft still looked new, no rust anywhere.

Once again, Google is my friend. I found a driveshaft shop that makes replacement universal joints for staked in universal joint drive shafts. This replacement universal joint has an internal snap ring designed to work with this type of drive shaft yoke.

I ordered two joints. The original joints were easily pressed out with my press. Once there was moderate pressure on the trunnion cap, bang! They popped right out.

Installing the new joints was slightly tricky. I had to dress the trunnion cap mating surface in the yoke with a half round file to remove the burrs from the previous staked in joints. I also needed to dress the inner face of the yoke to make a nice flat surface for the new snap rings to go. Once assembled, I needed to tweak the caps a tad to make the joint flex easily. Slight persuasion with a ball peen hammer was required to seat the trunnion caps with the internal snap rings. Once everything was done, there was no binding or free play in the joints. Before I installed the drive shaft I applied grease with the grease gun until I could see fresh grease oozing out of all four trunnion caps. Here is one of the old joints. Notice the burrs on the bearing surface.


Please email all inquiries to: Dave
or snail mail
32 Turkey Hill Road
Richmond VT 05477

The Parts Car – Dave’s Garage

Several years ago the price of scrap steel went up. Way up. As a result of this rise in scrap prices, many salvage yards crushed and scrapped much of their inventory. This was not a good thing for those of us with older cars.

Recently, scrap prices have dropped, dramatically. This is good news for consumers of used parts for older vehicles. Salvage yards are less inclined to scrap inventory, and older cars taken off the road are less desirable for scrappers. A recent search on Craigslist led to the discovery of many available parts cars, all at reasonable prices.

For older cars, Gates Salvage in Hardwick has piles and miles of cars. For more recent cars, local pick-n-pull yards or Craigslist probably have the car you are looking for.

Purchasing parts cars can be quite valuable during restorations, and for maintaining an older daily driver. I recently purchased several Saab 900 parts cars. Parts for Saabs are becoming hard to get. It is very handy to have whole parts cars available when parts are needed. Often a whole parts car can be had for the cost of one replacement part.

I have had many parts cars over the years. I usually end up selling parts I don’t need to other enthusiasts, often recouping the initial cost of the car. Once the car has been picked of useful parts, it goes to the scrap yard.

The only down side to having parts cars is storage. It is hard to justify valuable garage space for a junk car. A lack of adequate storage could be a problem. Ideally a parts car should be located in a garage, barn shed or in an outside area where the vehicle is not visible. Your parts car is an eyesore for your neighbors. Many municipalities have ordinances prohibiting possession of unregistered vehicles on the property. With a few tarps, a parts car looks the same as a woodpile.


Please email all inquiries to: Dave
or snail mail
32 Turkey Hill Road
Richmond VT 05477

Making non-ethanol gas out of ethanol gas (E10) – Dave’s Garage

Dave was super busy this month so the staff at Wheel Tracks decided to go with a story that Wendell Nobel mentioned about making non-ethanol gas out of ethanol gas (E10). The hope is that members will not try the process but instead will more thoroughly understand this ethanol problem that we have.

Wendell Noble tells a story of an article he read of someone in the Northeast Kingdom removing ethanol from his gas for his chainsaw use. The gent simply adds water to five gallons of the dreaded E10 gas. The water speeds the separation of the ethanol and settles to the bottom of the gas can. The gent then siphoned off the non-ethanol gas on the top. He uses the “stuff” on the bottom, the water and ethanol mix, to wash his windows! (who wodda guessed). Here is a more detailed process taken from an internet story……

How to make your own ethanol-free gasoline… Ethanol is the scourge of owners of old cars, motorcycles, boats, and many other gasoline-operated vehicles and implements. E10 (10% ethanol) is pretty much the only available gasoline in most of the country now, with a few stations offering ethanol-free gas. And E15 (15% ethanol) is coming soon, recently approved by the EPA for 2001 and newer cars – even though the car manufacturers don’t want it. You can thank the ethanol lobby for that.

What’s the problem with ethanol? The biggest problem is phase separation. Like brake fluid, ethanol is hygroscopic, which means it bonds very easily to water. If there is moisture in the air (which there always is), the moisture bonds with the ethanol. The combination of water and ethanol is heavier than gasoline, so it falls to the bottom of the gas tank, where the pickup is. Let it sit for any length of time, particularly with a partially-full gas tank (because the air space left will contain moisture, and will expand and contract with heat, sucking in more moisture-laden air), and your tank will have a layer of water/ethanol mixture on the bottom. This is called phase separation. Guess what gets sucked into your engine the next time you start it? The water/ethanol mixture will burn in your engine, but it will burn much leaner and hotter, with the potential for serious engine damage as a result. Ethanol is particularly corrosive to plastics, rubber, aluminum and fiberglass when compared to straight gasoline.

So what is the solution? Well, you can check out the web site http://pure-gas.org to try to find a gas station near you that sells ethanol-free gas. Hint: many boat marinas sell ethanol-free gas, because with the added moisture in a boating environment, E10 plays havoc with boat engines. How do you remove the ethanol from E10? It’s quite simple, actually – just add water! Remember, ethanol bonds strongly to water. All you need to do is add some water to the gasoline, agitate to make sure it mixes well, then let it sit for a few minutes. The water will bond with the ethanol, and it will phase-separate out, falling to the bottom of the container. So how much water do you add? It depends on a few things, including the actual concentration of ethanol (which will vary – it’s seldom exactly 10%), and ambient temperature. Dave’s testing shows that the optimal amount of water is 2% by volume of the E10. That’s 2.56 oz per gallon, or 12.8 ounces for a five-gallon gas can. Remember that extra water will simply separate out, so two cups (16 ounces) of water in a five-gallon gas can is safe. You should use distilled water only, to avoid leaving behind any minerals or other additives that your engine may not like (does fluoride keep your carburetors clean?).

Please folks, Wheel Tracks suggests that you do not try this procedure.
Isn’t it amazing the lengths folks have gone to operate their gas engines without E10?

One wonders if you line up twenty politicians in a row and ask why we have ethanol in our gas, what ridiculous answers we would hear.


Please email all inquiries to: Dave
or snail mail
32 Turkey Hill Road
Richmond VT 05477