Rubber Fuel Lines and Ethanol – Dave’s Garage

I have heard of people having problems with collapsed fuel lines due to attack by ethanol. Although most of my fuel line is metal, there has to be a short section of flexible line between the body and the carburetor. Is there any specific material you know of that is impervious to ethanol? When I asked that question at my local parts store, he first gave me a blank stare, then asked what kind of car it was for. When I told him it was for a ’29 Plymouth, I got another blank stare. Then he said he didn’t know of anything and suggested I use non-ethanol gas. That’s pretty consistent with your last column. -Wendell Noble

First, the good news:
Fuel line today is made of neoprene, not rubber. It is impervious to the alcohol in E10 ethanol. I usually use fuel injection hose, not fuel line because it is much more substantial. This is available in auto parts stores in 1/4″, 5/16″ and 3/8″. If you really want to be sure, you can use marine fuel line. This stuff will holdup to E85 and bio diesel. Marine fuel hose can be purchased from marine supply stores.

I would remove a section of the flexible hose and bring it to the auto parts store. The old rubber fuel hose will dissolve with the E10 ethanol we are stuck with today. Replacing the old rubber hose with new neoprene is cheap, easy and makes the car much safer and more reliable.


Please email all inquiries to: Dave
or snail mail
32 Turkey Hill Road
Richmond VT 05477

Penetrating Fluid 101 – Dave’s Garage

I have passed along the tip of using a 50/50 mixture of ATF and Acetone as an alternative to penetrating oil. Anybody who has turned a wrench on a daily driver, or restored their pride and joy knows what happens to all the hardware on our vehicles here in the wet, snowy salty northeast. There is a reason the northeast is referred to as the rust belt.

I have used both PB Blaster and Liquid Wrench for years. Of the two, I had a preference for PB Blaster.

I have mixed up the ATF/Acetone mixture for small jobs, but found it to be time consuming and hard to brush the mixture on to frozen hardware as needed. I recently bought an inexpensive oil can and filled it with the ATF/Acetone mixture. This will be my dedicated penetrating fluid can. I will use this as my first plan of attack when I am confronted by frozen hardware, and report back with the results. I’m already quite pleased with the savings. This concoction is a lot more economical than com-mercially available penetrating oils. Word of caution: Acetone is a solvent, and will mar paint and plastics.

Not convinced? Here’s the cold, hard facts from the April/May 2007 edition of Machinist’s Workshop. They did a test of penetrating oils where they measured the force required to loosen rusty test devices. The results reported were interesting. (The lower the number of pounds the better).

Penetrating oil Average load Price per fluid ounce

  • None …………………516 pounds
  • WD-40 ………………238 pounds ……$0.25
  • PB Blaster …………214 pounds .. $0.35
  • Liquid Wrench ……127 pounds ……$0.21
  • Kano Kroil …………106 pounds ……$0.75
  • ATF-Acetone mix…53 pounds ……. $0.10


  • Please email all inquiries to: Dave
    or snail mail
    32 Turkey Hill Road
    Richmond VT 05477

Ethanol does it, again! – Dave’s Garage

Several weeks ago I was mowing the lawn with my trusty 1978 Sears lawn tractor, when the engine suddenly sputtered and quit. I also smelled gas. A quick look under the hood revealed a split fuel hose. I replaced the hose, but noticed the leaking hose actually rotted out from the inside out. Another Ethanol problem. I was toying with the idea of writing an article about the fuel system in older cars and how to avoid problems with Ethanol.

My recent experience with the Stowe Car Show has a few Ethanol stories. Saturday morning a few people walked up to me and told me that my Volkswagen smelled of gasoline. A quick inspection revealed that there was gas leaking from the rubber hose that goes from the metal pipe in the floor pan to the engine. The leaking gasoline had actually caused the paint on the frame to bubble up and peal down to bare metal. When I restored this car in ’94, I had the floor pan painted with DuPont Imron urethane paint. At the time, it was considered to be just about the toughest, most resilient industrial paint on the market. I am quite upset that my beautiful floor pan now has paint bubbling up and falling off.

After a quick trip to a friendly and helpful flea market vendor, I crawled under the car to replace the hose. At the lowest part of the hose, the rubber was actually dry rotted away. Obviously, the cloth braided Volkswagen fuel hose is not Ethanol compatible. Later in the day I was trying to help a model T owner start his car. His carburetor was leaking gasoline. The float bowl gaskets were not Ethanol compatible, and neither was his float valve. The valve was sticking closed, then open.

So now what do we do? Modern fuel line is made out of neoprene, and is Ethanol compatible. I prefer to use fuel injection hose. It costs more, but lasts longer. Make sure when you order a carb kit or a fuel pump you buy a newer kit that is Ethanol compatible. I knew about carburetor gaskets not being ethanol compatible, but I was unaware of the problem with the needle and seat float valves. The old brass ones are ok, but the valves made with plastic and rubber parts may not be.

Gas tanks and metal fuel lines are probably ok, but a lot of the gas tank sealers sold until quite recently are not Ethanol compatible. Another problem is zinc parts. Apparently, zinc can be corroded by Ethanol.
Ethanol gas is a great solvent, and will remove gum, varnish and crud in the fuel system. This will plug up lines and filters. It is also a good idea to check filters more often.

Lastly, keep this stuff away from all paint work. It is also a great paint remover.


Please email all inquiries to: Dave
or snail mail
32 Turkey Hill Road
Richmond VT 05477

The Importance of Regular Maintenance – Dave’s Garage

Recently, I went to Rochester, NY for the New England MG “T” Register’s Gathering of the Faithful car show. I decided to take advantage of this trip to also bring my boys, my wife, two of my nieces and my parents to see Niagara Falls. That’s eight people with luggage if you’re counting…

How can I fit eight people in a seven passenger van? In the Chrysler minivans manufactured before the 2005 model year, the seats can be moved around. The three person bench seat can easily be moved up to the center row in place of the two captains chairs. So… It only made sense that I could take out the captains chairs, and add a second three person bench seat. A quick trip to Rathe’s salvage and I was all set. Comfortable, safe seating for eight, with ample leg room and everybody was belted in.

Anyway… Several days before the trip I was returning from Home Depot with a load of Sheetrock and lumber in my Chrysler minivan and the muffler fell off.

While the van was on the lift for the muffler replacement, I decided to give the vehicle a quick safety inspection before the 1,000 plus mile trip.

The van had just been inspected less than 3,000 miles ago, so I was not expecting any issues. A quick inspection of the brakes showed no surprises. Tires looked good. Tire presses were ok. All fluid levels were fine. Front end inspection, VERY LOOSE RIGHT BALL JOINT! It was just about to let go!

The van drove fine, no noticeable noise or movement in the front end. How could this happen?

When I took the old ball joint out, I could see that the cup was broken. It obviously failed fairly quick-ly. The surprising thing is that it gave no symptoms. The scary thing is that wheel was one good bump away from falling off, potentially at interstate speed with eight people on board.

The lesson learned? Pay close attention to your car. Inspect it regularly, especially before any major trips. Fortunately, a major and potentially fatal catastrophe was avoided with twenty minutes of work and less than $50.00 in parts. By the way, my new Harbor Freight Press is working quite well…


Please email all inquiries to: Dave
or snail mail
32 Turkey Hill Road
Richmond VT 05477

Yet Another Use for JB Weld – Dave’s Garage

I like to dabble with models. I have modeled specific cars, and specific trains. When I am working with die cast parts, or need to make a part I often use JB Weld.

Recently, our past VAE president and Wheel Tracks editor Gene Fodor was fortunate enough to find a nice, well used and mostly complete model MG TD (pictured below). Gene decided to restore the model, and model it after his 1953 MG, affectionately named Eliot.

[slide-anything id=’728′]

“Little Eliot” was missing the spare tire, the dashboard decal, and the steering wheel. Gene was able to locate a replacement spare tire and dash decal, but no steering wheel. These steering wheels were a very soft, high lead metal. They were easily broken, as the spokes in the wheel are quite thin.

I took it upon myself to create a new steering wheel for Gene and little Eliot.

  • First, I borrowed a similar model to use as a mold for the wheel. I carefully made a relief mold of silly putty, and filled the mold with JB Weld.
  • Second, I carefully pealed the silly putty off and cut off the casting slag.
  • Third, I took a piece of coat hanger for the steering shaft, hammered a flat on the end, and made a mold for the back side of the wheel. I carefully placed the coat hanger wire in the mold and poured JB Weld in to the mold. The final step was to bend the correct bends in to the shaft, and file and sand the wheel to the proper shape. I have used similar techniques to alter both model trains and cars to copy specific prototypes.

Gene has done a fantastic job with the restoration of little Eliot.


Please email all inquiries to: Dave
or snail mail
32 Turkey Hill Road
Richmond VT 05477

Pressing Needs – Dave’s Garage

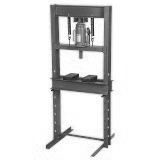
I recently purchased a tool I have been having a hard time living without. It is something that any shop should have, yet I have been working for years without one. I just purchased a 20 ton press. A press is really handy, almost essential for pressing out bearings, u-joints, ball joints and many other jobs.

20 ton shop pressA tool needs to justify the expense, and the floor space it takes in my garage. I have been looking at presses for years. I decided I needed at least a 20 ton, a 12 ton would not be strong enough. I saw prices around $1,000. That was way out of my budget. Harbor Freight had this 20 ton, and it had all good customer reviews. The price? $199. I don’t know how they can sell them so cheaply. I can’t even buy the steel to make one for that price. This press is well made, and very strong. It does not look any different than the $1,200 presses I’ve seen elsewhere. As with most tools Harbor Freight sells, I would not rely on them to make a living, with 8 hour a day use. For occasional use however, most Harbor Freight tools fit the bill.

I tried to order it on line, but the shipping would have been roughly $100.00. This purchase had to wait until I was near a Harbor Freight store. I tried to buy it the end of February when I was driving through Springfield, MA. Unfortunately, the Harbor Freight in Springfield didn’t have it in stock. On my way home from an MG event in Norwich, NY I stopped at a Harbor Freight store. Success…..in stock, $199.00 as advertised. I also bought a bench top 1 ton arbor press for light press duty. It was only $50.00. I’ll keep you posted on how they work.

Out of necessity I have learned a few tips to get jobs done without a press. When I have to replace a bearing, I usually hammer the old part out. If it is really stuck, I will use a cutting torch or a hammer and a chisel. I place the new part to be pressed in the freezer for a few days. I take the outer part (that the part is being pressed into) and place it in the oven for 20 minutes at 300′ (don’t tell my wife). The difference in size caused by the temperature extremes causes press fit parts to easily fit together. I recently rebuilt the transmission on my Saab. All the bearings are press fit, but I did not use a press. I used the freezer/oven trick for all of the new bearing installations, and it worked like a charm. The bearings just fell into place with a light “clunk” then the temperatures equalized and the pieces were tightly married together.

The temperatures that the parts were exposed to is no more than the parts will see in use. I only put all metal parts in the oven, and the temperatures on a cold winter night are colder than in the bottom of my freezer.
The oven/freezer trick takes time. The parts have to sit in the freezer at least overnight, and it takes time to wait for my wife to leave the house so I can borrow the oven. If for any reason I assemble the parts in the wrong order, I need to start all over again. The oven/freezer trick only gives you one shot to assemble everything correctly, and you only have a minute or two before the temperatures begin to equalize and the parts won’t fit. I’ve also been living in fear for years… Waiting for the investable day when my wife would come home early and catch me cooking automotive parts in the oven.

I am glad I finally have a press. It will be a big help with future projects. It is a tool I should have purchased years ago. Now that I have it, I can’t believe I lived without it for so long.


Please email all inquiries to: Dave
or snail mail
32 Turkey Hill Road
Richmond VT 05477

The Body Control Module (BcM) – Dave’s Garage

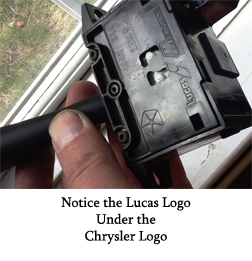
lucas body control module BCMAbsent any questions this month, I’ll tell the tale of a recent repair to my Chrysler minivan. I have had problems with the Body Control Module for the past few years. The BCM is the “brain” of the vehicle, and it’s function is the control of all things electrical in the vehicle. This part is vehicle specific, and stores all the vehicle data, such as the mileage on the odometer and the Vehicle Identification Number.

This problem first presented itself with the wipers, lights and door locks randomly going on and off, regardless of the switch positions. This would happen whether the key was on or not. I was always able to “fix” the problem by rebooting the BCM. Rebooting the BCM is accomplished by disconnecting the battery overnight. Simply disconnecting the battery for a few minutes or a few hours would not work. Sometimes the battery would have to be disconnected for a day or two for the reboot to be successful. After a successful reboot the repair would usually last for several months, but the problems would always reappear. Recently, the wipers and the low-beam headlights ceased to function. I suspected the BCM, but a re-boot did not yield a fix. I checked the usual suspects, fuses, relays, bad grounds, etc. I quickly determined that there was no power going through these circuits. I thought I should check the wiper stalk, which is also the high beam/low beam switch. Imagine my surprise when I took the switch out, and discovered the Lucas Electric logo stamped on to the switch. You know, Joseph Lucas, Ltd. Birmingham, England- the punch line of many a joke about the poor reliability of English cars.
This switch actually tested out fine, so the BCM was once again suspect. Remember, the BCM is unique to the car in which it is installed. Even If I was lucky enough to find the same year, make and model van in a salvage yard, the BCM still holds the identity of the car it is built with. The VIN number and mileage are both stored in the BCM. The cost of a BCM through a dealer costs well over a thousand dollars, and the part needs to be programmed to the vehicle at an additional cost.

A google search proved to be quite productive. I found an outfit in Michigan that has identified the weakness in Chrysler BCMs and rebuilds them with improved components. All they need is the year, make, model, mileage and part number on the BCM, and they send you a rebuilt BCM already programmed for your car. While not cheap (at $250-including shipping…) it is less than a quarter of the cost, better quality and much faster turn around time than the dealership.

What did I learn from this experience? With today’s cars, there is less of a difference between foreign and domestic cars. With world wide vendors supply-ing the OEM parts market, there is no telling what you will find. I was stunned to find a Lucas switch in a Chrysler minivan.

It also pays to use the Internet when doing automotive repairs. Finding the outfit in Michigan that repairs Chrysler Body Control Modules probably saved me over a thousand dollars.


Please email all inquiries to: Dave
or snail mail
32 Turkey Hill Road
Richmond VT 05477

Talking Shop – Dave’s Garage

No questions to answer this month, so I’ll take this opportunity to “talk shop.”

I like to work on cars. Fortunately, antique cars give me plenty of opportunities to do just that. Occasionally a problem will come up and it will stump me. This is often upsetting at the time, but usually works out well in the end. I say this because I usually end up buying a new tool, or, I learn something.

I have a rather large assortment of tools, from a nice collection of hand tools to more specialized tools. Several years ago Wilson Tire in Lebanon, NH sold off all their equipment, including the lifts. I was able to buy a two post lift for my garage at a very favorable price, and now I am equipped to do most repairs on cars. I refuse to buy a tool that I will only use a couple of times. If it becomes clear that I will get a lot of use out of a tool, I will purchase it, but it needs to justify the expense and the amount of space it takes up in my gar-age. I can do my own A/C repair now, but I don’t have a fancy several thousand dollar evacuation machine, I have a $15 dollar compres-sor powered vacuum pump from Harbor Freight. It works, and I’ve probably used it 4 times now.

The tool I use the most, though, is my computer. Knowledge is power, and if I need to learn about something the internet is always just a few finger strokes away.

I have found the Internet forums quite helpful. There is more knowledge and experience there than in any book. Chances are, whenever I have a problem or a question I need answered there is a group of people who have already solved it and they are all too happy to help. This resource is invaluable for answering questions and solving problems. The internet is very useful during a restoration, from find-ing pictures of how things are supposed to be assembled, to finding out the finer points of originality, all the answers can be found on line. If you have a particularly troubling problem, come to a VAE meeting and ask for help. You will be hard pressed to find another room with more knowledge and people willing to help. If you can’t wait for a meeting, pick up the VAE Roster and look for a person with a car similar to yours, and give them a call.

Another tip I have found to be very beneficial is the use of another similar car. It is amazing how we get used to something, and then just assume that it is normal. The best way I can judge what is “right” on any particular car is to compare it with a car that is right. Take the opportunity to drive someone else’s car. This is a great way to see if everything is as it should be on your car. It is truly amazing how things change over time, and we get used to it. Our cars need to drive safely, and we simply cannot drive with brakes or suspension components that are not up to par.


Please email all inquiries to: Dave
or snail mail
32 Turkey Hill Road
Richmond VT 05477

Fluid Changes – Dave’s Garage

In prior columns I’ve discussed various automotive fluids, which types to use and why to change them.

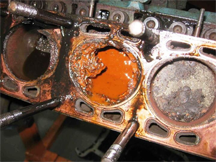
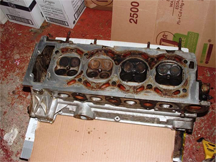
corroded cylindersBrake fluid needs to be changed every two to three years, or replaced with DOT 5 (Silicone) fluid. Failure to do so will result in low boiling temperatures and seizing pistons in calipers and wheel cylinders, resulting in brake failure.

Transmission and differential oil needs to be checked to ensure proper lubrication. Engine oil needs to be changed regularly to prevent sludge, varnish and corrosion inside the engine. Soft metals like bearing shells can be damaged if the engine oil can be damaged by neglected engine oil which can become acidic. I have recently seen several photos that very graphically show the importance of regular coolant flushes and refills. The anti-corrosive properties of automotive coolant slowly fade away until the coolant can no longer protect against corrosion.

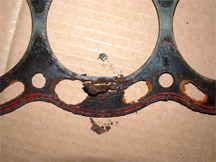
sabb 2c head gasket failureNotice this head gasket failure from a 2L Saab engine. The gasket literally corroded away. A very expensive repair that could have been avoided with some simple and inexpensive preventative maintenance.

vw porsche cylinder head corrosionSo if it has been three, five, or even ten or more years since you have changed your coolant, you may want to put this chore on your to do list before your pride and joy looked like these pictures. Certain Porsche, Volkswagen and Franklin owners need not worry.


Please email all inquiries to: Dave
or snail mail
32 Turkey Hill Road
Richmond VT 05477

Coolants 101 – Dave’s Garage

Recently I got a question about the many different types of antifreeze available today. Specifically, what type to put in a new Honda with blue coolant. So, here it is:

Types of Coolant (Antifreeze)
Today’s coolant market is confusing. In days past all coolant was the green ethylene glycol variety, one type of coolant for every car. Now it seems that every car manufacturer has at least one color of coolant. What Type of Antifreeze Should I Use?…..All Makes and Models?…Extended Life 150,000 Miles?…..Green, Red, Yellow, Orange, Pink, Blue? There are a lot of choices of different automotive coolants today. So, which one should you use in your car? You should use what your car was made to have. However, sometimes it may be difficult to decipher what the original equipment manufacturer (OEM) used, especially if you purchased your car used.

Basically, there are three basic types of automotive coolant: Inorganic Acid Technology (IAT), Organic Acid Technology (OAT), and Hybrid Organic Acid Technology (HOAT).

IAT coolants are the “traditional green” variety used in virtually all American vehicles from the late 1920s to the mid to late 1990s. Like all antifreeze, it is naturally clear; its color comes from dye. Unlike the other types of antifreeze, it uses silicate and phosphate corrosion inhibitors to protect the metal parts of the engine and cooling system. However, these inhibitors wear out quickly, so IAT type coolants need to be flushed every two years or 30,000 miles. OAT coolants typically do not use silicate and phosphate corrosion inhibitors. Different manufacturers use different chemical additives to battle rust and corrosion, and they all dye their coolants different colors. GM’s ubiquitous DEX-COOL coolant is an OAT antifreeze dyed orange. Toyota, Volkswagen, and Audi all use their own formulas that happen to be dyed pink. Honda uses a dark green (blue) dye. OAT coolants have longer service lives than IAT coolants, needing to be flushed every 5 years or 150,000 miles. HOAT coolants use different additives than OAT, but also use some silicate to protect aluminum surfaces. Modern Ford, Chrysler, and most European vehicles use their own HOAT coolant formulas. Ford’s is dyed yellow and Chrysler’s is orange (not to be confused with DEX-COOL). Both use the marketing name of GO-5. HOAT coolant has the same service interval as OAT (5 years or 150,000 miles).

Summary:

  • IAT – Used in early to mid-late 90’s Domestic vehicles…….This type is good for our antique cars
  • OAT – Used in late 90’s GM and most Asian vehicles
  • HOAT – Used in 2000’s Fords, Chryslers, and most European vehicles.

Although you can mix coolant types without harm, it is highly recommended against. If you mix an OAT or HOAT with an IAT, you will lose the extended service life of the OAT or HOAT coolant. Some people say that if you mix these types of coolant it can result in the coolant gelling, but if you keep your cooling system well maintained, this should not be a problem.

And finally, what about the “Universal, All Makes, All Models” coolant you see stuffing store shelves? Basically, those are OAT DEX-COOL clones. I would personally steer well clear of them unless your vehicle is de-signed for OAT coolant. You should always check your owners manual, and make sure the coolant you add is the same type of coolant your car requires.

Thanks to “how-to-matthew” for information contained in this article.


Please email all inquiries to: Dave

or snail mail
32 Turkey Hill Road
Richmond VT 05477