Wheel Tracks Articles Archives

Battery Life – Dave’s Garage

Hi Dave. I have a question that may be good for Wheel Tracks as well. Battery life. Since we all have old cars that are not used too much–or not enough is a better description. I am now in a position that 6 car battery’s are over 8 years old. Some still working and others don’t have enough power to crank the starter. That can be a size-able expense that will face me again in about 5 years assuming that is the life expectancy. What options are there for Battery’s besides going new?

There are two real options for buying new. Conventional “wet” batteries, and newer, spiral glass mat gel cell batteries, like the “Optima” battery. If properly maintained, batteries can go strong for eight years or more, while a service life of 3-5 years is more typical. The biggest issues with the conventional “wet” batteries are:

  1. They leak. Battery acid is nasty, and can do considerable damage to the body of the car it is in. Leaking near the terminals can also cause considerable corrosion at the terminals.
  2. Conventional batteries lose energy, about 1% a day. This is made worse if it is a parasitic drain on an installed battery, like radio memory for example.
  3. Conventional batteries do not do well in hot environments, the water in the acid solution will evaporate. Heat is one of the biggest killers of “wet” batteries. It is often said that batteries are fatally damaged in the summer, then fail when the weather gets cold in the fall.
  4. Conventional batteries discharge explosive hydrogen gas, presenting the possibility of an explosion given the right situation.
  5. Conventional batteries must be mounted rigidly, right side up. They can not be tipped or subjected to severe vibration or jarring im-pacts. If tipped, they will leak. If shaken, they will fail structurally inside and could potentially short out. If loose, in addition to being unsafe, they will jounce about causing failure internally.
  6. If not properly charged, conventional batteries will freeze, and be destroyed. A charged battery has a freeze point of -95’F. A discharged battery will freeze at 20’F.

The other option is a glass mat spiral gel cell battery, like the Johnson Controls “Optima” battery. These batteries are significantly more expensive, about $50 more.

Gel cell batteries do not leak. Because they do not have the acid bath construction, they can be mounted in any position, even up-side-down. There is no concern about leaking acid or corrosion on the battery terminals. These batteries also do not discharge hydrogen gas, so there is no issue with venting them. Because there is no issue with evaporation of the electrolyte, they hold up better in very hot environments.

Because of the spiral, fiberglass mat gel cell construction, these batteries hold up very well to vibration and jarring impacts.

AGM batteries discharge at a much lower rate than conventional “wet” batteries. This can be a big plus for a vehicle that spends a considerable amount of time in storage.

The down side of AGM batteries is they are considerably more expensive, and there reliability is spotty. I have had three fail in less than two years. The warranty of the Optima is only a two year replacement warranty, kind of skimpy given the high purchase price in my opinion.

How can they be stored over the winter to maximize life?

Conventional “wet” batteries do well with a battery tender hooked up to them. Battery tenders charge the battery, then provide a “float” charge to maintain a full charge. They will not overcharge the battery. When the vehicle is returned to service, simply unplug the battery tender, and you are good to go. AGM batteries can simply be unhooked and left in the vehicle, they will not discharge.

Do battery’s like “Optima’s” last any longer in rarely used vehicles?

In theory, yes. In reality, that depends. I have had three Optima batteries fail in under two years.

Also, when I check my acid, I am finding particles in the fluid. Is that a sign that the plates are going bad? It actually looks dirty. I’d also guess you’d tell me to wait until spring to buy one. Otherwise it will sit on the shelf for 5 months.

When you check the acid, it should be clear. If it isn’t, there are impurities in it. This could be caused by sulfate on the lead plates, or impurities suspended in the acid. Either way, the battery is no longer good. If the plates are sulfating, the battery will not provide the proper amperage. If there are impurities in the electrolyte, the battery could short internally.

Proper maintenance of the battery includes checking the level of the acid in the individual cells. Only add distiller water. There is a myth that you should add acid. The level drops when the water in the solution evaporates. If you replace the water, you are keeping the concentration correct. The plates should remain under the surface of the acid.

I have learned that buying a new battery that may be “special” and some are, does not mean your getting a fresh battery. It may well have been left on the shelf waiting for me.”

The first thing you should check when purchasing a battery is the manufacture date on the battery. It will give the month and the year of manufacture. The battery should only be a month or two old. Any older, and I would ask for a newer one.

I always load check a battery to check it. I have a carbon pile load tester. It will put a load on the battery, and maintain the load for about ten seconds. There is both an amperage and a voltage gauge on the meter. If either the amperage of the voltage falls during the load test, an alarm sounds, and the needles on the gauges sweep down. If the battery is good, the needles on the gauges hold. Snap-on sells such a tester for about $600. I got mine at Harbor Freight for $50. I’m sure the Snap-on is a much better unit, but mine has worked fine for many years and I have no complaints. The Harbor Freight unit is well made and has good reviews.

Please email all inquiries to: Dave
or snail mail
32 Turkey Hill Road
Richmond VT 05477

1960 Hillman Minx

1960 Hillman MinxHillman is a name not well known in the automotive field anymore. Hillmans are British and like most British manufacturers of automobiles, the Hillman Motor Car Company is defunct. The last Hillman imported into this country was the Super Minx of the mid 1960s. The company was still being run by Lord Rootes, a founder, at the time. The Hillman Motor Car Company began in 1907. Previous to that, the company had made sewing machines and bicycles. Hillman played a role in pioneering the American automobile market, opening doors for other makes back in the days when those funny foreign cars drove a lonely road in this country.

Hillman had been importing small sedans since before World War II, but after the war, the small car market became more competitive. To get a leg up in styling, Lord Rootes hired the designer Raymond Lowey (think Studebaker Hawk of 1953) in 1948 to design a new car. Thus came about the shaping of my car, which takes styling cues from the 1953 Studebaker and the 1955-56 Ford. To further compete in the American market, Rootes sought a technical advantage as well. After all, some American manufacturers were starting to build “compact” cars, bidding for sales with fresh new packages. Consider the Ford Falcon or the Chevy Corvair. In 1960, Hillman was offering a product that no one else had-a fully automatic transmission that did away with the power loss associated with ordinary automatic transmissions of the day. Acceleration of a Hillman does not suffer as a result of the Easidrive option. This was important in 1960 because thousands of drivers in this country didn’t want small cars because of the bother of shifting gears manually. The Easidrive was a significant small car development in the days of oversized Detroit sedans and small, slow American cars optionally equipped with automatic transmissions.

I bought my car in 2002 from an antiques dealer in Wiscasset, Maine. It had been acquired by him as part of an elderly man’s estate. It had 40,000 miles on it then and I have taken it 24,000 sort-of carefree miles since then. My initial test drive of the car did not inspire confidence. Looking behind the steering wheel I noticed it had….an automatic transmission? I had always feared foreign automatics of the post-war generation since they could be weird and prone to trouble. Oh well, the car did start right up and sounded solid and quiet. The gear selector quadrant is minimalist in nature: D 2 N R in that order. There is no P position and I assumed the handbrake was a dubious instrument as evidenced by the rock placed behind the rear wheel. The car moved forward in D but would not shift into a higher gear. I stopped and gave it another try. This time, at about 15mph, I lifted my foot off the throttle and heard a distinct “clunk” and then we were in 2nd gear. At about 27mph the car shifted automatically into 3rd which felt like top gear. I could live with this. I came to a full stop and tried reverse. There was a slight grinding of gears to be heard as I shifted the lever. What the hell kind of automatic was this???

Thus begins the tale of what makes this car different. Here in layman’s terms is the Easidrive story. Remember the science experiment back in elementary school in which iron filings placed on a piece of paper were arranged in lines of magnetic flux by a magnet placed beneath the paper? If you can visualize that experiment, you have the basic idea of Easidrive. Easidrive uses a magnetic powder coupling in place of a friction clutch. The transmission itself is a regular sliding gear type 3 speed transmission. Imagine a drum bolted to the flange on the rear of the crankshaft. Then, imagine a slightly smaller drum which fits inside the aforementioned drum and is connected to the transmission input shaft. These drums are separated by a small air gap filled with an amount of iron powder. In neutral, as the crankshaft turns, this powder is thrown harmlessly by centrifugal force against the inside of the outer (crankshaft) drum. Now surround these drums with a stationary magnetic coil mounted in the transmission’s bell housing. When this coil is energized, the iron powder organizes itself in columns of magnetic flux between the two drums, forming a solid coupling between the engine and transmission. The advantage to such a coupling is that there is little or no slippage. There is no hydraulic torque converter to waste power, an important consideration in a 57 hp, 2375 lb. car such as the Hillman. This represented a design coup, applying a fully automatic transmission to a 1500 cc car.

But the devil is in the details, of course. All this stuff under the floorboards is con-trolled by the troublemakers under the bonnet, or hood as we Yanks would put it. This trouble includes: an electric gear selector switch, a governor which monitors road speed and throttle position, a gearshift solenoid and a control unit (black box) which contains eight 2 way relays, a thermal switch and a rectifier. Maintaining this lot is no problem if you’re an electrical engineer, which I am not. Fortunately for me and my Minx, my brother is. All the above-mentioned electrical units are wired closed with lead seals from the factory. Even Hillman mechanics were not allowed to open them up and investigate what might be wrong inside. Units were tested and if found faulty, replaced. Even the experienced garage mechanic in the early 1960s had no idea what he was looking at when he got under the hood of an Easidrive Hillman Minx. It was just another weird foreign car that nobody, including the dealers, wanted to deal with. This contributed greatly to Hillman’s demise. As the Easidrive reputation spread, dozens of new Easidrive cars sat in dealers lots unsold for years.

My car has experienced burned relay points and a broken wire in the control unit as well as another broken wire in the governor. My brother was able to decipher its woes from among the 96 symptoms and numerous wiring diagrams featured in the Easidrive repair manual. We broke into the sealed units fearlessly and solved my Easidrive’s problems. It wasn’t easy. It took about 8 hours, but I’ve been lucky. Most Easidrives were converted to normal Hillman 4 speed manual transmissions or simply scrapped. And that’s a shame because it is a nice car on the road or in town. I’ve driven without trouble to Ohio and back for 3 different “Hillmans on Holiday” car events, cruising at 65 mph with no trouble. I only know of one other Easidrive in the country, in Washington state, which is still running. I doubt we’ll ever meet car to car.

“Braking News” or “LED Story” – Dave’s Garage

How many of you are worried about over-taxing the electrical system on your antique car?

How many of you are looking for a way to make the rear lights on your car more visible? Recently I was behind a Cadillac with a LED third brake light and conventional incandescent left and right stop/directional lights. I was struck by how much faster the third brake light illuminated as compared to the conventional incandescent tail lights when the driver hit the brake.

MG TD led brake lightI thought about this when our MG TD burned out yet another brake light switch. The replacement brake light switch lasted about 300 miles before it burned out. The replacement switch just can’t handle the amperage of the incandescent stop lights. The MG does not have a relay in the brake light circuit, or any other circuit for that matter. All the switches in the car handle the full amperage of the circuit. Of course this is true for the stop light switch too.

Another problem with the tiny brake lights on the MG is they are dim, and not very visible. I have almost been rear-ended more than once, and I have even had people yell at me that the lights don’t work, because they could not see them in day light.

So, I have decided that with the lower current draw, quicker illumination, longer life, cooler operating temperature, and most importantly, the brighter light it would make sense to replace the standard incandescent bulbs with modern, plug in LED bulbs.
The old bulb is a clear bulb behind a red lens, so it makes since to get a replacement white led bulb right? WRONG! Science has a nasty way of proving conventional wisdom to be wrong.

Here is the reason that you do not want to use white LEDs behind a colored lens or filter:

  • Unlike tungsten lights, white LED’s ‘trick’ the eye into seeing white. Most White LED bulbs are made using two wavelengths of light, 460 nanometer Blue and 590 nanometer Amber. They are mixed about 70 percent blue and 30 percent amber. Using white LED’s behind a filter (Red or Amber) will actually result in very little light being visible at all. This is because red and amber LEDs are color specific, they only emit one color. Incandescent bulbs and white LEDs produce all colors, which produces a visible white light.If you put a white LED behind a red filter, all of the colors and the light energy required to produce those colors are filtered out, re-sulting in a much dimmer light.Assuming that you are using a white LED behind an amber or red lens, you will lose (in the case of an amber lens, about 70% of the light generated). It is a very counter productive thing to do.This is why they make white, amber and red plug in replacements for standard 1156 and 1157 bulbs.

    The physics behind this is a bit complex. All you need to remember is to use a white LED with a white lens, a red LED with a red lens, and an amber LED with an amber lens. Simple enough, huh?

    LED lights are another great invention that offers a modern, plug in upgrade to the old car hobby. LED lights are much safer, use a fraction of the electricity, run cooler, shine brighter, light up faster and last much longer than conventional incandescent bulbs. By replacing just the rear bulbs, there should still be enough of a load on the circuit to still cause the flasher unit to operate for the directionals.

    LEDs are Light Emitting Diodes. Diodes only allow electricity to travel in one direction. They are like one way valves for electricity. When ordering replacement bulbs you must specify positive or negative ground, and 6 or 12 volts.


  • Please email all inquiries to: Dave
    or snail mail
    32 Turkey Hill Road
    Richmond VT 05477
Fond Farewell

There are, as I’ve said before, some of the nicest, kindest, interesting and unique, members of our VAE club. It seems appropriate to pay tribute to Joe Kaelin and Gene Towne whom we lost recently. I didn’t know Joe as well as I knew Gene, but always thought he had the kindest face and demeanor about him. Meeting his family at his memorial service illustrated what a great parent and grandfather he was. One of his daughters told us how Joe was always available to watch over grandchildren and she shared with us a “Joe moment”. A granddaughter was crying and carrying on when he turned to her and said, “You need to stop that noise – it is Sunday and therefore not your day to cry”, and then went back to what he was doing. She was so busy trying to figure out what had just happened that the crying ceased. Joe had such courage and always kept his subtle sense of humor, indeed, a unique gentleman.

We first met Gene when we bought his house in Milton located on what was appropriately called Swamp Road. We had to walk to the house, as the road was impassable by car, truck or tractor, a real mud bog in the spring. We bought the house anyway as it was brick and surrounded by beautiful countryside. One day in mid winter, Gene stopped by to ask what we were using for water. I answered, “the faucet” and he said, “I’ll be darned; that water pipe under the road usually is frozen by now”. Sure enough, two days later, it did freeze, so we called Gene and asked what do we do now. “Oh, you call the local “go-to” guy who will bring out his arc welder, hook it onto that wire next to the road and thaw out that pipe.” Wendell knew the wire he meant, because he had cut it off the previous sum-mer. After much poking into frozen ground with crowbars, shovels, etc., we finally located the pipe and had it thawed. This was in the 1970’s and over the years we met the entire Towne family and were made to feel part of it. Then there were the phone calls from Gene: “Wendell, want to go to an auction or sale and/or check out a car, boat, tractor, or, let’s go to Dearborn for Ford’s anniversary celebration.” “Mary, how do you make rice pudding?” “What’s that guy’s name? You know, the one that lives on the hill?” He was always sure that I needed something he happened to have (many “somethings”), and I should come over and take a look. I’m not sure that we ever saw him wearing anything but his trademark overalls, slouch hat, and suspenders, of course. We will miss Joe and Gene and feel privileged to have had them in our lives. They were true Auto Enthusiasts!

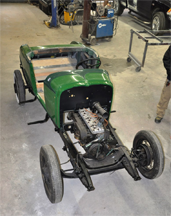
’30 Chrysler Roadster CJ

2013 Chrysler Roadster CJThe picture here was taken in Wendell Noble’s barn in Milton, Vermont about a week ago. As you can see much more work remains but it should be easy to see the exhaustive work that has been done.

Resurrecting an old car takes determination, planning, a lot of love and simply one step after the last until it is complete; Wendell Noble is on that journey with this 1930 Chrysler Roadster CJ (Chrysler Junior). Wendell had completed the wooden sections of the body using mostly rotted parts as patterns that he found at a location in South-ern New England. He then attached the steel ‘skin’ with screws and nails; just like the facto-ry did it in 1930. The CJ body arrived at John Johnson’s body shop in Enosburgh (Mountain View Autobody & Sign Design…check out the business card on page 14) last Fall for the finish paint work. The correct paint color was found, after a lot of research and 85 to 100 hours later the beautiful green finish with a darker green trim was completed (see page 16). Here is a part of the process at the body shop…

  1. The body was attached to a dolly while at the paint shop. Ken Labonty did most of the 70 plus hours of work on the body to get it ready for paint. The first task was to remove most of the filler that Wendell had applied during his hours of preparing it for paint. Johnson said he wanted to be certain the filler would be compatible with the layers of work that he would be adding. Johnson’s advice; if you are going to bring him something to paint…just prime the steel, he will do the rest. The plastic filler that Johnson uses is Everlast Rage and when that work was complete it was block sanded with an 18X4 inch pad four times using 36 grit to 180 grit paper.
  2. The next step was to use a relatively new process of ‘spraying’ the coats of filler on the body then going through the block sanding pro-cess again. Body filler resin is a thermal-set plastic, it cures with heat. In body-shop terms, the thermal-set filler allows it to “not-wake-up-again” so no matter what is added to the surface of the filler material, the filler will not break down. It is unbelievable the humps and bumps an automobile can acquire over the years, especially an 83 year old car, and that is where the filler comes in. Light is used to detect the body imperfections but a good body-man can simply use his hands to know where the work is needed.
  3. When the filler process was complete it was time for Ken to apply the Acrylic Primer Surfacer, at least three layers so the sanding pro-cess will not ‘break through’. Then more sanding with up to 300 grit paper.
  4. Next the Primer Sealer is applied and Ken’s job was done; the body was ready for the ‘base PPG 2-stage’ paint and then the clear coat. That is when Chad Johnson comes into the story, Chad is John’s broth-er and the resident paint expert. When the base coat is complete a clear coat is applied and for this CJ there was up to 30 hours of buffing that brought it to the finish you see today.

Wendell then brought his frame to the shop and everyone was involved in very carefully placing the body on it. Speaking to John Johnson later, he mentioned the work on Wendell’s car would have cost at least another 25% if it needed to be returned in a short or specific time. Having the car for these 11 months allowed him to bring it out when the shop was not busy instead of having his shop tied up with this one project. Something for all of us to think about when we send a project out.

So, where did Wendell get this 1930 CJ? It came from a VAE member who lives in the North East Kingdom, Dave Maunsel. Wendell got the car basically as a collection of parts and pieces, just like Dave had gotten it some 34 years earlier from a gent in Saxton Rivers, VT. Dave had collected additional needed parts while he had it along with hav-ing the engine rebuilt by Tri-Town Automotive in Brattleboro. Dave did work on the frame, hired a fellow to rework the doors and found a friend of Pevy Peake’s to do body work on the cowl, hood and rear deck. As the repaired car parts returned to the Maunsel home they found many places for storage….over the garage, in the cellar and even under some beds. When the collection of parts arrived at Wendell’s home it was discovered the doors were missing. Dave found them three days later in an upstairs closet.

Dave has always loved the Chrysler CJ since he had a 4-door sedan in the 60’s while attending UVM in Burlington. He bought the 4-door from a Shelburne dealer by the name of Henry Parker and drove it for 15 years. When asked about the best feature of the car Dave said the Lovejoy shocks were probably it. The ride is great and his car never breaks down.

So when Dave heard about the CJ Roadster for sale in 1979 he had great plans to be driving one again. The day Dave purchased the col-lection of parts there was no paper to be found to write a bill-of-sale so instead of paper a hub-cap was used. The Saxton River gent turned out selling what he called a “complete car” with a few important parts missing and no matter how hard Dave tried to get the parts he was not successful.

Dave was later able to find what he needed for parts in Monticello, NY; a rumble seat lid and many of the rear steel body parts. Asked where the bill-of-sale hub cap might be and Dave said it got miss-ing years ago.

You can see in the picture to the left the Chrysler CJ is now continuing it’s restoration journey. Finish assembly, the electrical, the upholstery, some chroming and maybe even a new top. Dave Maunsell said, in jest, that he should have included in the sale agreement that he be allowed to have the finished CJ to drive for three weeks…..wouldn’t that be a hoot!

Six Volt Starter Woes – Dave’s Garage

Dave, The battery is strong & keeps a charge…’the’ starter works well when it is not installed in the car…when (you) install the starter & depress the starter switch (you) get a clunk & then an excessive pow-er draw (all other power will go out, lights, etc.). -Ken

Ken, I suggest load testing the starter, to ensure the current draw was not excessive.

Here is what I did:

1. With the starter out of the car, I used my volt meter and checked to make sure I had power to the “in” connection of my starter switch.I then checked to make sure there was no power at the “out” connection (the connection that goes to the starter). Then I had my wife step on the starter switch, and verified that I had power at the “out” connection. Everything worked fine, as expected. So far, so good.

2. I then installed the starter motor and did the same thing. Had power at the “in” connector of the starter switch, no power at the “out” connector. Then I had my wife step on the starter switch. I lost all power. No power at the “out connector”, no power at the “in” connector either! She would release the starter switch, I again had power at the “In” connection of the starter switch. I have taken the starter out of the car, I will get it load tested. But I am confused about what is happening.- Ken

Ken, It sounds like either the ground side or the hot side has a bad connection, one that breaks when there is a strong load on the circuit. I would check the grounds first. There should be a stout ground from the battery to the frame, and another from the engine to the frame. If there is a strong cable connection from the starter ground to the ground side of the battery, then the next thing to check is the cable from the hot side of the battery to the starter switch. There should be a large cable with a smaller one branching off for the car electrical system. There should be a straight shot with the main cable from the battery to the starter switch.
Keep me posted…

Dave, I bought another battery and two new battery cables. I disconnected the regular battery from the starter and then connected the positive terminal of the new battery directly to the starter switch. Then I connected the negative terminal of the new battery directly to the bolt that holds the starter in place (attached to the engine). The car started just fine. That proves there is nothing wrong with the starter or the starter switch.

The problem is when the car is hooked up to the regular battery. The car was originally set up to have positive ground, and the negative line going to the starter switch and ignition switch. But it apparently was changed at some point, as the positive now goes to the starter switch and ignition switch.

I still don’t understand why I would lose all power (to the starter and to the ignition switch) when the starter switch is pressed (I lose headlights, dash lights – everything). Perhaps the battery is not well grounded to the car.

I finally had some time to work on the Packard today.

As you last remember, when I hooked the starter to a separate battery, it worked fine. But when hooked to the regular battery it would not work (a quick “glug”, then I would lose power to everything – headlights, horn, starter).

Today I hooked up the starter to the old battery, but replaced the cable from the battery to the starter. It was the only “original” cable of the starter circuit of the car. This cable was cloth covered. The other three cables were plastic covered – the original cloth covered cables had been replaced at some point before I got the car. When I bent the cable as I was taking it out, the cloth cover disintegrated.


Please email all inquiries to: Dave
or snail mail
32 Turkey Hill Road
Richmond VT 05477
End of Summer

I would be lying if I said I was sorry that summer is over but I am! Now it would be a bigger lie if I said I was looking forward to what is coming, winter! I have never enjoyed winter. I tolerated it better when I was younger but couldn’t say I really enjoyed it. Do find that with winter, if you can get out and do something like ski, sledding, cross-country skiing or snowshoeing, you are less apt to hate the season. Should have included snow-shoveling (one of Gary’s favorite sports!) I have done all these in years past but no more. My focus is now on trying to stay upright and not going down on the ice!

Summer- this was supposed to be the summer of sitting at camp, swimming and growing heirloom tomatoes! I stayed one night at camp, went swimming twice and those tomatoes – nota!

We started in May preparing for a yard sale, helped plan the VAE Bennington tour, had the yard sale, greeted our grandchildren and son from Montana, took our son to airport for trip back to Montana, grandkids stayed, took in our Vermont grandchildren (now we have two granddaughters 5 and 7, two grandsons 8 and 9). We hosted the group for a couple of weeks. It was fun but so much harder than I remember. On July 20, we head west with the Montana grandkids in the big red truck with the ‘old’ basic pickup camper. First highlight was Niagara Falls with a ride on ‘Maid of the Mist’, then onto Ontario to a Butterfly Sanctuary, so far so good. Back to the USA and headed toward Mt. Rushmore, stopping at the largest truck stop on I-80 in Iowa. Can’t think of anything you can’t get or do there! (legal or illegal), about half way to Montana, Grace and Quinn decided that going by airplane was the way to go! There was quite a discussion on the fact they would be home and with family and friends and this way they would probably never get there! Thankfully, these thoughts were short lived as Grandpa found something fun and interesting to stop and see. We stopped and explored places, went through the Badlands and many, many more. We camped all the way out and back (about 6000 miles). Have to say that the ride back was extremely quiet. Some thought we were crazy and I guess we were a little. But, looking back, we are so glad we went this way. There were some tense times, some tears (mostly mine), a lot of laughs and a lot of talking (on their part and ours), we traded a lot of stories and tried to solve many world problems. Our wish is that a cross country trip with Grandma and Grandpa will be remembered and passed on to their children (with or without embellish-ments!) Should be good for a few laughs in years to come.
Now you would think that after a trip like that you could kick back and relax- not if you are ‘car people’! Just back and we headed to New York State for the ‘Slowspokes’ tour planned by Bill and Jan Sander. Great tour including train ride, boat ride on the Erie Canal and many wonderful sites. A great time was had by all. Is it over? No way. After a short time to clean your clothes, get a new toothbrush and pack, we were off for a 4 cylinder Plymouth tour, planned by Gary and Wendell. Beautiful tour of Ludlow, Grafton, Bellows Falls area (my home area). I think there were 31 people (from VT, NH, NY, Ohio, Texas and Ontario), there were 9 Plymouths and again, a great time was had by all. As I write this, Gary is on his yearly pilgrimage to Hershey with 2 batches of brownies and 5 dozen chocolate chip cookies. I’ve gone back to work.

We will still have to put the cars to bed for winter and there are leaves to rake, camp to close and then all that will be left is to find the perfect piece of cardboard and just wait for that first snowfall!

AACA Hershey Fall Meet

What is a mile long, about a third of a mile wide, has just under 2000 vendor stalls and a car corral with 450 really neat cars for sale?
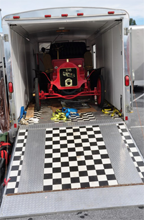
Yup, that is the “AACA Hershey Fall Meet”, “Fall Hershey Show” for short.

1906 Wayne
A 1906 Wayne waiting it’s turn on Stage. 2000 Waynes were made, this is one of eight remaining.
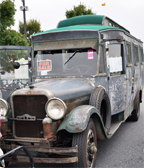
1929 Studebaker House Car
1929 Studebaker House Car. It weighs 12,500 Lbs., can sleep 4 people and has a bath tub. For Sale for $165,000

A Family Vacation

It was now 1928; and our family had never all been away together. In fact, Dad had not been away from the ranch since he came there from St. Albans with a carload of Vermont Jerseys in 1910. My Mother’s family worked for the railroad and always had vacations. Dad finally agreed to make arrangements to be away from the Ranch and it was decided to go to Colorado. Mrs. Coe, of the family that ran the general store, contacted her father, Mr. Shoemaker, who lived in Denver and he agreed to arrange a trip from Denver up onto the mountains and rented a cabin for us. We packed suitcases (no trunks, of course, in our old Dodge sedan) and stuffed them into racks on one side of the car. Inside we had a small case of eggs and a box filled with a double boiler, frying pan, and box of oatmeal. Our little sister, age 4, sat between the parents in the front seat and the other four of us sat in the back seat with our feet on top of the boxes on the floor.

The first day we got only as far as the Colorado border, a distance of 200 miles. It rained, making the gravel highway slippery. The roads always had ditches on each side for drainage, for often rains were heavy. We called that kind cloud bursts. On this day, every so often there would be a car in the ditch and we would have to stop to help them get back on the road. We stopped at the first group of cabins (the name for motels then) that we came to. Mother went in first and quickly pulled back the bedding to make sure there were no bedbugs! In the morning we had our oatmeal and fried eggs before we resumed our journey. The route was through the eastern flat land of Colorado and we noticed large fields of lettuce. Dad was curious and stopped to investigate – and ended up buying a small crate, which had to be crowded in with the other paraphernalia on the floor of the back seat!

It was late afternoon when we drove into Denver. At one point we came to a long line of cars in our lane. Dad just pulled over and drove up to the head of the line and went through. Mr. Shoemaker put us up for the night in sort of a loft in the building where he lived. We probably had another oatmeal and eggs breakfast before we started for the mountains; Mr. Shoemaker squeezed in with us in the back seat. We got back on the highway we had come in on, and Mr. Shoemak-er pointed out that there was a red traffic light ahead, and we were supposed to stop! This was the first time we had ever seen such a thing and, of course, we realized what had accounted for the long line of stopped cars when we came into Denver!

We soon got on to Long Mountain and were amazed at the narrow, winding road. Sometimes when meeting an approaching car, one would have to back up to a wider space. It was pretty scary. We arrived at the cabin safely, overwhelmed with the scenery, the like of which we had never seen before. The next day we explored the surrounding area, making snowballs when we found patches of snow. As we anticipated leaving for Denver, Mother announced that she would not go down in the car. “How will you get home?” Dad asked. Mother, coming from a railroad-oriented family said “There must be a train!” Needless to say she joined us for the trip down which we made safely. At one point when Dad remarked about the view, Mother told him “We’ll look at the scenery, you watch the road”.

After leaving Mr. Shoemaker off in Denver, we made a side trip but were advised not to try Pike’s Peak in our old Dodge. We found a park with charcoal cookers. Dad bought some ham and eggs which Mother fried in the skillet and of course we had lettuce too. The trip home across Colorado flats was extremely hot, and the patches on the inner tubes kept melting off, resulting in flats. After many repair stops, we finally got to Garden City, KS and bought replacements. We also decided to keep on driving through the night for the rest of the way home. Mother and I took turns sitting next to Dad to make sure he didn’t doze. It was daybreak before we arrived home. John and Catharine were sleeping soundly, so the rest of us rushed into the house and our beds. They had their own stories to tell about when they woke up, such as eating berries off the back porch vine.

We were so impressed with our “vacation” that very soon thereafter, I went to Dad’s typewriter and wrote a long account with carbon copies for the family back east.

My 2 Cents on Engine Oil – Dave’s Garage

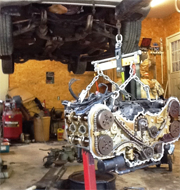
subaru outback engineRecently, I had to replace the head gaskets on my Subaru Outback. The car had 205,000 miles on it. Outside of replacing the spark plugs, I have not done anything to the engine.

When I took the engine out, I was expecting to find the engine to be tired after going so many miles. I was surprised to find no wear on the engine. The valves were not worn. The cylinders still had the hone marks on the walls. There was no sludge or varnish to be found anywhere. If I did not know the car, I could have been convinced that the engine had very few miles on it.

There has been great discussions recently about the reduction of zinc in modern engine oil due to the zinc harming the catalyst in catalytic converters, and how this was detrimental to older, flat tappet camshafts and lifters.

I was surprised to find that my Subaru does not have roller camshafts, but rather the older style flat tappet camshafts. The car also has a “shim and bucket” style valve lash adjustment. To adjust the valve clearance, shims are added or removed to achieve the proper clearance. After 205,000 miles I gave the valves (all 32 of them) and camshafts (all 4 of them) a close examination. I could find no evidence of any wear, and all was within tolerance. I had everything checked at the machine shop when the heads were planned, and they confirmed that all was as it should be. I did replace the valve guide seals while it was all apart.

So, with an engine in such good condition, why did I have to replace the head gaskets? Well, the heads were both warped and had to be planed .007″. Why were the heads warped? I don’t know. I asked at the machine shop and I was told the Subaru heads just warp. The good news is this was the first H6 engine they have ever worked on. For comparison, they said that they planed a record 26 four-cylinder heads in just one day.

This car has always had Mobil 1 engine oil, and it has only been changed every 10-15 thousand miles. This confirms what I have suspected for years. Modern synthetic engine oil is remarkable, and proven to prevent engine wear. I have been working on engines for over thirty years. I have been inside engines that looked like BBQ grills, I’ve seen thick sludge, and I’ve seen thick brown varnish throughout engines. I have yet to see any evidence of this type of contamination, or significant wear on engines using quality synthetic oil. Modern engine oil has come a long, long way and todays synthetic oil is nothing short of remarkable.


Please email all inquiries to: Dave
or snail mail
32 Turkey Hill Road
Richmond VT 05477