1935 Packard  Limousine

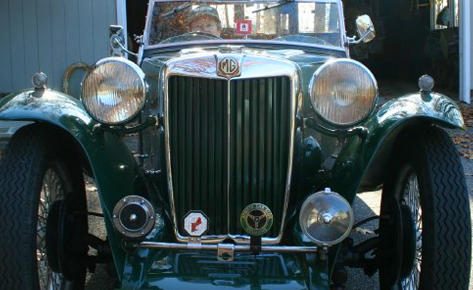
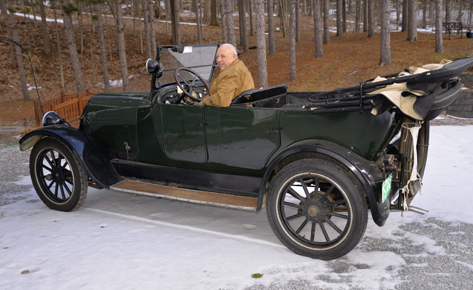
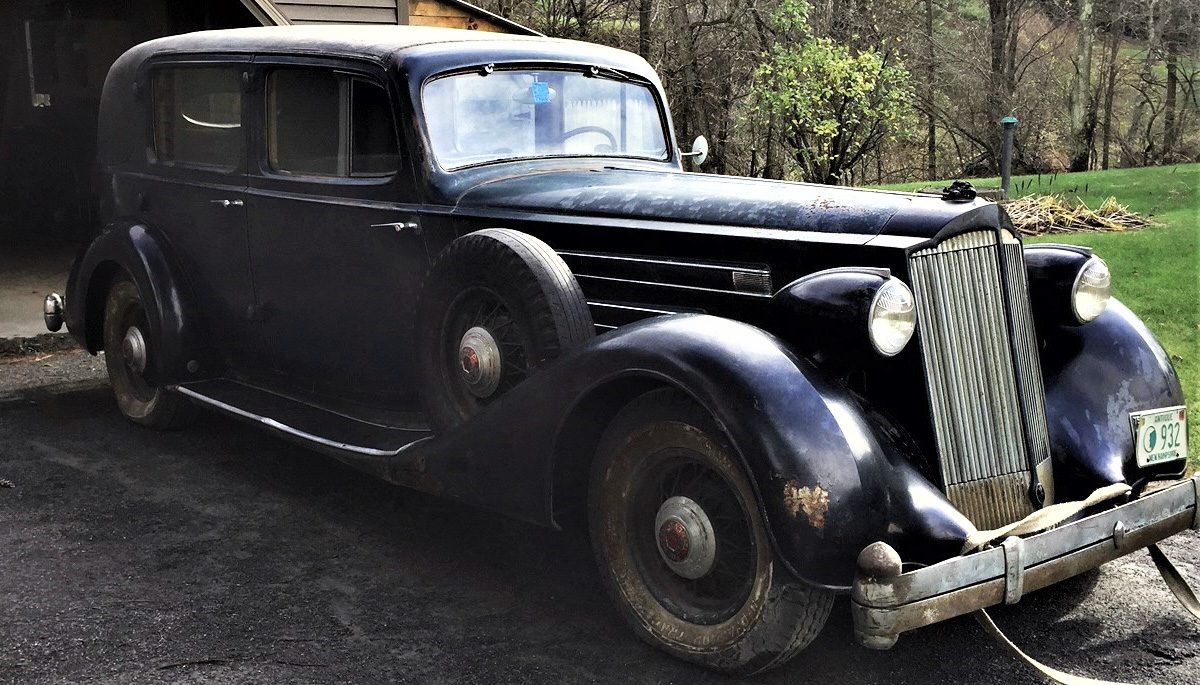
Tom Noble’s 1935 Packard  Limousine

I think the best way to tell the story of the car is in two parts – first the part I know is actually true, and secondly the part that might be complete bunk…

The car is a 1935 Packard V-12 limousine that my grandfather, Bert Pulsifer, acquired sometime during the 1960s from a man named Charles Barnes. Charles was renting a house from my grandfather at the time and, having run out of money to cover rent, offered the car in lieu of of rent. My grandfather was a collector of cars and took him up on the offer. He kept the car and entered it in local parades from time to time and my Uncle Scott drove it occasionally- although I’m guessing a V-12 limousine wasn’t something anyone could afford to drive regularly even then! I do remember it sitting in the garage at Grandpa’s farm and pretending to drive it when I was little – as a kid that was the most impressive car in the world!

1935 packard limousine
Charlie Noble, Tom and Michelle Noble’s son will be driving this beast of an automobile some day.
Perhaps to his senior prom dance!
Charlie is in junior-high today and Wheel Tracks has learned he has some dance moves to die for….

I also remember the whole family washing and waxing it in preparation for a parade. This must have been done many times because even then the paint was worn through in places. The parade I remember best – and I think it was the last time it was driven, was in 1982. The Packard had a tendency to vapor lock and I recall it did it at least twice that day. The first time was at a gas station on the way to the parade. We had stopped to fill up, but couldn’t get it to start after. Fortunately, one of Grandpa’s friends was also on his way to the parade, with his similar vintage Jaguar, and offered to push start the Packard with it. This worked and we made it to the parade.

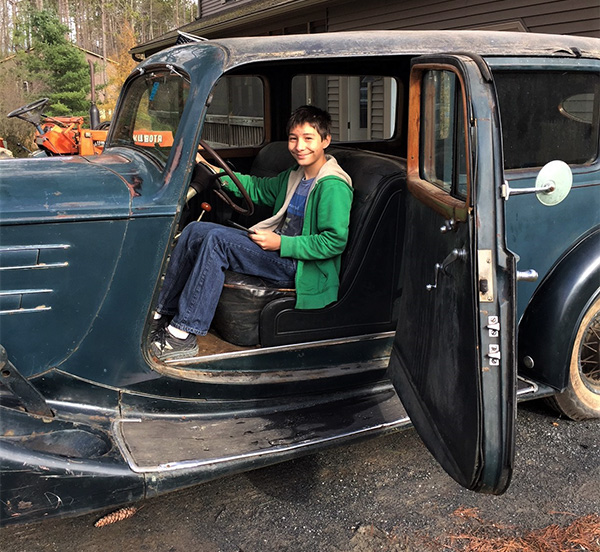
Unfortunately, we didn’t make it THROUGH the parade. About halfway through, she vapor locked again and had to be pushed aside to let the rest of the parade go by. I’ll have to dig out the picture of me, with my Grandpa’s Mason’s ballcap on, leaning against the fender, waiting for it to cool down. My grandmother wrote on the back “Thomas guarding the Packard”. (This picture never made it to Wheel Tracks).

1935 packard limo
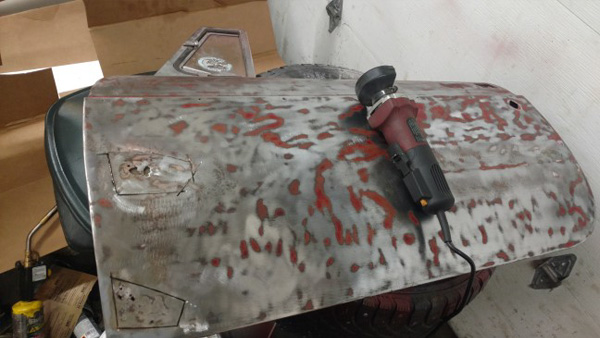
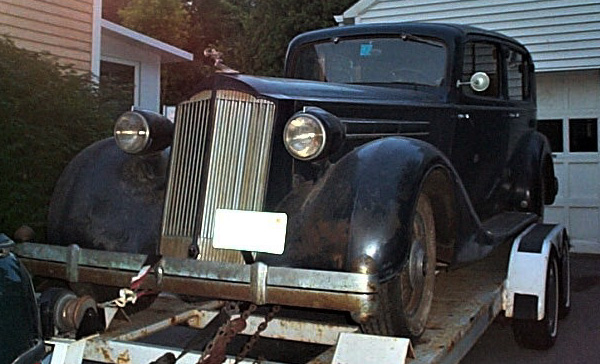
When Grandpa passed away, he left the Packard to my Uncle Scott. Uncle Scott didn’t really have a good place to keep it, and knew that I had always admired the car, so he gave it to me. I’ve had to move it a few times since then and it has remained my “someday” project that I plan to get going as time permits. The first project will be to get the gas tank cleaned/rebuilt – 30 year old gas does some bad things to the inside of a gas tank!

The part of the story that might be bunk, is the detail of Charles Barnes – I was always told that Charles was of the “Barnes and Noble” Barnes from Rhode Island. Apparently he was the black sheep of the family and had a girlfriend that the family did not like or approve of. The family told him he needed to leave the family estate, but that he could take any car he wanted as long as he left and didn’t come back. The car he chose, of course, was the Packard. He headed north and ended up near Plymouth, New Hampshire and began renting the house from Grandpa.

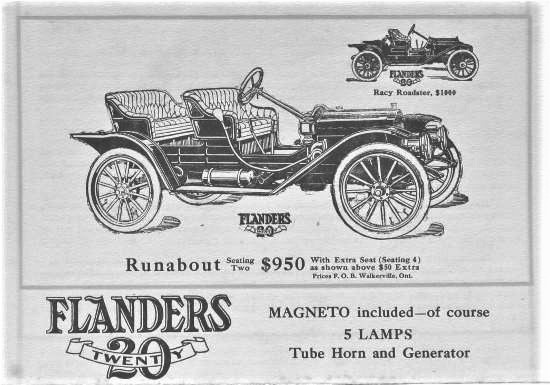
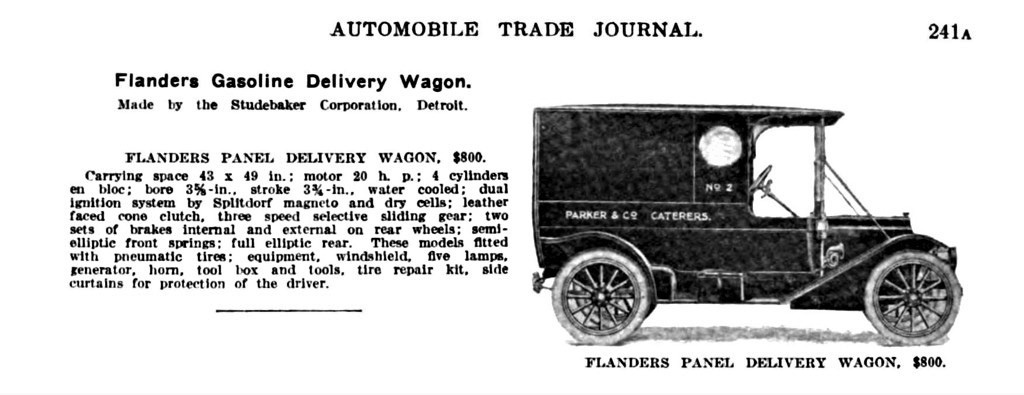
From Lester-Steele Handbook & Standard Catalog of American Cars “Packard Twelfth Series- Twelve”

*Price new….$4485.00
*Bore & stroke…3.44 X4.25
*HP….175 @3200RPM
*Weight…5900lbs
*WB– 144.25 inches
*Carburetor….Stromberg-Duplex
*Gear-ratio options,4.41, 4.06, 4.69, 5.07
*Tires…7.50X17
*3-point engine rubber suspension
*15 12-cylinder body styles offered with the limo being #835.
*Engine, 67 degree V-block, modified L.
*Displacement, 473.3 cu. in.
*Four main bearings
*Trans, selective synchromesh 3F/1R.
*Clutch, single plate, vacuum assist.
*Brakes, mechanical, vacuum assist 4W
*Options…dual sidemounts, bumper guards, radio, heater, spotlight.
*Introduced August 1934.
*V-12 model choices, series 1207wb139” & series 1208wb 144.25(the limo)
* Total factory production for all models including V8 & V12…..788

Rust Repair

Recently I have had two cars in the garage for rust repair, a Saab 900 and an MGB.

The interesting thing is, on each car the rust was caused by poor body work. Each car had plastic body filler repairing a dent. The body filler was applied to bare metal. At some point, the body filler cracked and moisture seeped in. Body filler does not stop water.

Water can creep down through the filler to the bare metal, and cause rust. On each car the metal behind the body filler had rusted away, leaving rust holes.

After I do the hammering and welding, I coat bare metal with epoxy primer BEFORE I apply any body filler. I also start with aluminum body filler first, then transition to traditional polyester body filler. Aluminum body filler does offer some resistance to moisture.

To fix these rust holes, I used a cut off wheel to cut out the rusted metal. Next, I traced the cut out piece on new sheet metal with a sharpie marker. I carefully cut the piece out, subtracting about 1/16” on each side. The new piece was carefully mig welded in, only welding about 1/4” at a time to prevent heat warpage. After the weld-ing is finished, the welds are ground flush and the metal is hammered flat. Next I apply a layer of epoxy primer, followed by a light skim coat of body filler.


Ramblings of a ‘Mature Lady’

As I ‘mature’ it seems that I become more aware or should say irritated with things happening around me, i.e. the idea that school should start an hour or more later in the mornings, to allow our children to “get more rest”, and thus they will certainly do much better in school. Poppy cot!! What is keeping these children from going to bed at a reasonable hour? I fear it is TV, iPods, computers, tablets, smart phones and NOT reading, homework, household chores, or even a job. Let me say here that I am sure there are some out there that do work or have household responsibilities that prevent an early or even reasonable bedtime hour, but I believe this is the exception and not the rule.

One of my concerns is that every generation (for the most part) are getting ‘softer’ and it will manifest itself in ways that are not good for us or them. I am part of the problem, as I expected less of my children than was expected of me. I am sure my brothers and sister didn’t think so at the time, but Mother expected less of us than what was expected of her. At age ten she took over as chief housemaker for her Dad, 3 older brothers and 1 younger than her. She cooked, cleaned, did laundry and went to school. Because she was 10 and not very tall yet, her brothers made her a box to stand on, to make rolling pie crust easier! Now wasn’t that a nice gesture? She never talked about it as a burden, in later years, but something she did because it was needed. My 2 brothers were up in the morning at 4 or 4:30 to go to the barn and help feed and milk the cows, home about 6 to bathe (so they wouldn’t smell of the barn) and still had a mile to walk to catch the bus for school, only to reverse the process when school was out. Walk home, change clothes and back to the barn. Did I mention that the bathroom time was scheduled, so 5 of us could get in and out on time with only 1 bathroom, to some, this would be third world conditions! And believe it or not, there were some people at the time, that didn’t have that in Athens, Vermont in the early 50s.

It was barn work that I threatened my boys with, when they were young, if they complained about doing some chores. Also, just an update, my brothers graduated from school, got jobs (now retired) and survived their early years just fine. I don’t know if they regret it, but I feel bad they didn’t have time for the school sports, etc., that most have access to today and wouldn’t want that to change.

Have school start later? Not in my opinion. Make it mandatory that children work 6 months on a farm; definitely! You can’t know what work is until you do some.

Is Grandma’s opinion popular with her grandchildren? NO WAY! They are thankful I am not raising them, and I am not their school teacher, but I do hope that there will come a day when the 4 of them are sitting around camp swapping stories and they decide that Grandma had a lot of things ‘spot on’.

1919 Ford Model T

Tin Lizzie, Leaping Lena, or Flivver is a few of the names for Ford’s Model Ts.  Dave Welch’s 1919 Model T, above, fits these names.

dave welch clock shopDavid Welch has a clock shop in the old Kennedy Brothers building in Vergennes and has been in the repair business for many years. He is also “the cook” according to his 90+ year dad, Steve. Dave and his dad live together. When asked the time that Dave gets home from work at the Clock Shop, Mr. Welch replied that he hoped by five PM, because he is the cook. They live in a wonderful area along lake Champlain, where the extended Welch family have lived for a number of generations.

1919 ford model t flivverThe Model T has spent over 35 years owned by VAE members, starting with Ed Rotex. Wheel Tracks understands Ed “just ran the T around once in a while”.

From Ed the car went to Tim Hunt, then to Ed Welch. The last 30 years the car has been in Carl Tatlock’s garage, who gets credit for many of the upgrades on the vehicle today. The story goes that Carl is a stickler for detail, the proof is this Model T.

The next home for the T is Mr. David Welch and the way he acquired the car can only happen in the VAE. Carl “gave” it to Dave, a gift many of us only dream of… a fantastic gift.

1919 ford model t cockpitWheel Tracks has found some mysteries and solved some mysteries with this old T. It is known that the 20 HP engine is not original to the car, but no one knew the year. Research has revealed the #13669202 engine was built in May of 1926.

*The big surprise was when the car was built, it turns out, it is not a 1919 Model T! Ford numbered the engines when they were built and when the engine was placed in the car during assembly, the frame was stamped with the engine number. The frame on Dave’s T is #8893000 which tells us the car was built in December of 1923. The vehicle number and the factory production number is the same, so this car was number 8 million, eight hundred ninety three thousandth that Ford had made by that date in 1923. The 9,000,000th was completed at 1:05PM on December 26th, 1923.

The Model T Club of America publishes the total number of Ford model Ts built was 14,689,520 when they closed down the T line in 1927 and started building Model A’s. Model T engines continued to be built through 1941, for an additional 169,856.

Wheel Tracks can not find what this car started its life as. Was it a touring car, a runabout, or a coupe? Or maybe a Tudor or a Fordor or even a truck? Are there any T folks out there who can help?

Here is some additional 1923 information from the T club….. The “1923” touring car style was introduced in September 1922, with a one-man top and sloping windshield, but otherwise the body was the same as the 1922. The runabout followed about November, with a new body and turtle deck as well. A new “Fordor” sedan appeared in December 1922, which used aluminum panels throughout the body. The cowl section and lower body section were changed to steel during the year. There was no cowl vent in the early Fordor sedans but the vent was added during early 1923, before the change to the larger hood. The Coupelet and Sedan (Centerdoor) continued into 1923 with minor modifications that were introduced in 1922, but were both replaced with the new Coupe and Tudor Sedan in August 1923. The front section of the car was revised about August 1923, with a new and higher radiator, larger hood, a valence under the radiator, and revised cowl section to match. These cars were generally referred to as “1924” models in Ford literature. The Coupe and Tudor Sedan were all new, with coupe doors opening at the rear. Body construction continued with the metal panel over a wood frame design.

* This paragraph could have problems…..1. If Ford sold just the engine, then there would be no chassis to stamp. 2. Wheel Tracks took the chassis number from the cars registration form, not the chassis, there could be a different number on the chassis.

Automotive Primers

1018 primer adMy last column discussed the evolution in paint technology. This month, I will talk about what is under the paint and talk about primers.

Automotive primers have come a long way in the last few decades. Primers serve several functions. First, they bond to and protect bare metal. Second, they fill very small imperfections. Third, they provide a stable base foundation for the top coat, or color paint.

Why are there so many types of primer? Not too long ago, primers were lacquer based. If the top coat was lacquer this was simply applied over the primer. If the top coat was an enamel paint, an enamel primer/sealer was applied over the lacquer primer. These primers were often unstable, and did little to protect metal from corrosion. Lacquer primers would shrink months or years after being sprayed, showing sanding marks and causing the top coat of paint to crack. Lacquer base primers do not shed water, they actually absorbed some moisture. This moisture would then find its way down to the bare metal. Of course, lacquer based paint will go back to a liquid when exposed to a solvent, like lacquer thinner.

auto paint sprayAcid etching primers did a good job of adhering to bare metal, but offered little corrosion protection.

Epoxy primers, or “2K” primers bond well to bare metal, and also offer excellent corrosion protection. Epoxy primers are not sandable, and do not work well as a primer surfacer.

Primer-surfacers are used for final body work to give a smooth, flat surface foundation for the top coat or color paint. These primers have filler in them, and are easily sandable. These are the primers that are laboriously block sanded until the surface is smooth and flat.

Once the block sanding is done the primer is sealed with a sealer primer.

Final paint will show color shift if painted over different color primers, and will also show any sanding marks. Color paint is only a pigment, and will not hide anything underneath.

Confused yet? Don’t be. There is a system to priming. You may remember about 20 years or so ago car ads talked about the multi layers of paint. As urethane paints began to dominate the automotive paints, these “multi-layer” paints became standard.

First, an epoxy, or catalyzed primer coats and seals bare metal. There may be a self etching or acid etching primer under the epoxy primer. Epoxy primer has exceptional adhesion and corrosion protection.

Over the epoxy primer is a primer surfacer. This primer is sanded smooth and flat. Over the primer surfacer is a sealer. The purpose of the sealer is to provide a thin, hard, smooth surface over the primers for the color coat. Without the sealer primer, sanding marks and color changes will show in the top coat of paint. Sealers need to be top coated relatively quickly for the color paint to bond well.

If the color coat is a base/clear system, then there are two additional layers of paint on top of the primers.

I am amazed at how well these new primers work. I have had excellent results with using epoxy primer for rust repair. The rust repair actually outlasts the factory corrosion protection. Two part catalyzed primer surfacers are easy to sand, and remain stable forever. No more sanding marks showing up months after a car is painted. I often use epoxy primer thinned with reducer as a sealer. It is a bit more expensive than sealer, but it is one less product to have on hand, and I have been very pleased with the results.

Winter Tires

From Judy………By the time you read this, everyone’s fall chores should be done. Wouldn’t that be nice….with one exception. Winter tires.

Gael likes to set a date in November to do this, often Thanksgiving weekend. I like to be ready for that first snow/freezing rain event. We seem to have had this same discussion for 50 years.

My biggest chore is putting on the storm windows. We have the old wooden ones, take them off in the spring, putting them on in the fall. The trouble with this fall chore, all the windows have to be washed, both sides of the storm windows and the outside of the house windows, and then while I’m at it, the inside of the house windows, all 21 of them. Getting them squeaky clean with no streaks is another problem. I’ve spent years cleaning windows many different ways, only to find smudges on them when looking through them in winter, when it’s too cold to do anything about it. Sharon Fiske put me onto a good cleaning product last year and I love it. It works! A few years ago, we installed those little number button things on the windows and corresponding window sills, which make another problem much easier.

Now that the storm windows are on, I move on to the flower beds. Because of the HOT/DRY summer we’ve had, I was ready to cut the flower beds back weeks ago but it was still too hot for me. If it doesn’t get done this fall, I’ll deal with it in the spring. I do have a list of gardening reminders going for next year because I can’t seem to remember much from year to year.

Then we move on to the wood pile! Our son, Owen, has been a great help this year and had most of it cut and split before black fly season arrived. Now it’s time to move the wood to the porch, but we can’t do it until the porch furniture gets moved to the upstairs of the barn, which we need help doing. Seems to me we need more and more help doing stuff lately! Now it will be time to rake leaves, not my favorite chore. A few years ago, our daughter, Susan, gave Gael a leaf blower for Christmas. It sat around for a while, but Gael got it out one year to see how it works and it does! It takes hours and in the end, you have several huge piles of leaves. Now it’s time to move the great piles of leaves. We used a huge king-size sheet that came from somewhere and that works great, and when done, folds up into a small pile to be put away until next year. Getting the leaves into the truck, driving down the road and depositing the leaves in a meadow is the next step, but an easy one. What to do with the geraniums that are still in bloom!! I usually bring them inside (something in past years I said I wouldn’t ever do again) and water them until they die in March. Some people have good luck keeping them over, but we don’t have a good place to put them, either, it’s too hot, there isn’t any sun or something. Then, come spring of next year, I’ll go to the local greenhouse and I’ll buy new ones in full bloom already.

Lastly, getting out the snow scraper from the back of the car, placing it close to the driver’s seat and making sure the tow rope that I got for Christmas a few years ago is in the car. This was a wonderful gift and I was glad to have it on more than one occasion. I do have a good story about my tow rope that I’ll share with you if you are interested. As of now, none of the above have been done. It’s still too early. But when the weather is right, the big rush is on.

Automotive Paints

This month’s question comes from Wendell Nobel:

Dave, I would love to read a little dissertation on automotive paints. I recall a day when GM cars were all painted with acrylic lacquer and Fords were acrylic enamel. Now we have polyurethane base coat with clear coat, single stage urethane and even some water based stuff. What is an antique car guy to make of it all? Should we use what was on the car when new or get up to date? Will environmental laws make the question moot?

Let me first briefly explain the history of automotive paints. The early autos were painted with the same paint people had been painting carriages with for years. There was no “automotive” paint. Not paint in the traditional sense we think of when we talk about paint today. Early paint was basically linseed oil and a binder, with pigment, or crude shellac. This paint was applied with a brush and took a long time to dry. These paints were not very durable, often literally falling off the metal in a year or two. These finishes offered very little U/V protection and broke down quickly.

The biggest challenge with producing the Model T Ford and other early cars was the time and space needed to paint cars. The parts were laid out on the floor and took days to dry. This bottle neck in the production was a huge problem.

Nitrocellulose Lacquer paint was developed to alleviate the time/space problem. Nitrocellulose Lacquer paint is made from the nitration of cellulose plants (boiling down plant fibers and mixing with nitric acid). This is also how celluloid film was made. The solvents evaporate from the paint, leaving a glossy durable paint finish. These paints need to be “rubbed out” to produce a shine. This paint does not “cure” and will return to a liquid state when solvents are applied. A popular early nitrocellulose lacquer paint was DuPont “Duco” paint.

Nitrocellulose Lacquer dominated the automotive paint market from the early 1920s well in to the 1950’s when it was displaced by Acrylic Lacquer, a synthetic polymer acrylic resin based lacquer. Acrylic Lacquer dried quickly, however, still needed to be buffed to a high gloss.

Enamel paints used enamel resins. This type of paint takes much longer to dry than lacquer and actually dries in two steps. First, the enamel reducer evaporates and the paint becomes solid. Next, the resin oxidizes when it reacts to the air. This is why the new finish cannot be waxed for 30 days after application. The enamel paints dry to a hard, glossy finish and do not need the rubbing out as lacquer needs. The drying of enamel paints could be accelerated by the use of a baking oven.

Enamel paints required the need for clean spray booths. The paint took so much longer to dry than lacquer paints; the finish was much more susceptible to damage from debris before it dried.

Lacquer and enamel paints were much more durable than the paint they replaced, but still offered minimal protection against U/V light and corrosion.

Lacquer and enamel paints are very unstable, and begin a color shift almost immediately. This fact makes them very hard to color match. People go to great lengths to match original colors. Unfortunately, the reality is the “original” color was so unstable there really is no true original color. Two cars painted the same color at the same time would not match each other after a few years time.

Today’s urethane paints offer much more protection than the lacquer and enamel paints they replaced. Urethane paint cures in three steps: evaporation of the reducer, oxidation of the resin and an irreversible chemical reaction between the resin and the isocyanate catalyst. Urethane paints began to be widely used in the late 1980s.

Base/clear paints offer even more protection. The color coat is completely buried under a protective clear coat. The clear coat provides the gloss in the paint.

Modern catalyzed urethane primers and paints offer a finish that can easily last the life of the car. I have found bare metal painted with epoxy primer and top coated with urethane paint offered very effective protection against corrosion.

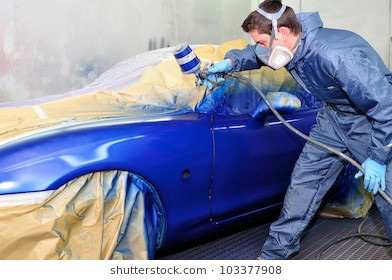
So, what is an old car person to do?

Nitrocellulose Lacquer is almost impossible to find today. It also cracks easily, and will return to a liquid when exposed to solvents. Lacquer requires sanding and buffing to get a good gloss. Enamel paints are harder to paint, do not have stable color pigments, and oxidize quickly.

An authentic restoration would require the use of the original type of paint. Modern urethane paints do not have the same gloss and color hue; however, they are much more stable. Enamel paints are still available, although somewhat hard to get. Given the time and expense involved in a proper paint job, you have to consider the service life of the paint. Do you want to paint it again in 10 or 15 years?

Modern urethane paints are very forgiving to paint, and last a long time. Modern urethane finishes have a fantastic shine, and require minimal maintenance.

If you want to exactly duplicate an original car, you may want to consider a period correct paint. If you want the best shine, great corrosion protection and minimal maintenance you probably want a modern catalyzed urethane paint. I guess it is ultimately up to the user to decide which way to go.

Just to complicate things, there are new paints being used now which are replacing urethane paints. Waterborne paints are now on the market. Waterborne paints do not have the Volatile Organic Compound exposure of urethane paints. Use of waterborne paint, is being mandated slowly, due to environmental concerns.

A Drop in the Bucket List

About a year ago during a visit with our daughter, Martha in Colorado, she guided us on a trip to the Grand Canyon. On the way back she commented, “Mom we should go on another trip”. Where would you like to go? I suspect that she was thinking along the lines of a bucket list. I rather reluctantly responded the first place that came to mind “Uh, Alaska”, maybe because it starts with an A. I think I also suggested Hawaii.

Being of the digital social media generation, she immediately was on her smart phone and started the arrangements. Therefore, for a couple of weeks in June this year, we were in Alaska, landing in Fairbanks where we were met by our tour guide and bus driver, who were awesome with information about flora, fauna and wild life.

In Fairbanks we had an up close view of the oil pipeline, that runs from Prudhoe Bay to Valdez. We also had a paddle boat cruise on the Chena river where we were able to visit an authentic Athabaskan village and see a lady working her sled dogs. We took a tour bus to Denali National Park, a beautiful ride. While touring through the park, we were privileged to see plenty of moose, Dahl sheep, fox, hares and a mother grizzly bear with her two cubs.

We then took a train (first class with vista cruise type car and great dining car service) to Anchorage and then on to Seward by bus. In Seward we cruised the fjord to see sea otters, orca whales, humpback whales and a close up of a calving glacier (not an animal but a hunk of ice). The weather was beautiful and the only wildlife we didn’t see were mosquitos.

I would strongly encourage a trip to Alaska. I do think you would want to have a good guide, and would recommend Trafalgar. With twenty-two hours of daylight, seeing the sights is a given.

Our daughter is now suggesting that our next tour be Africa. That starts with A also, but I’m not so keen on that. Maybe too much wildlife.

1966 Chevrolet Corvette Stringray

This is Len & Jeanne Pallotta’s 1966 Stingray Corvette.

This is part of the Corvette story written by Len Pallotto in 2005 for Wheel Tracks….

“Our Corvette”

1966 stingray corvette
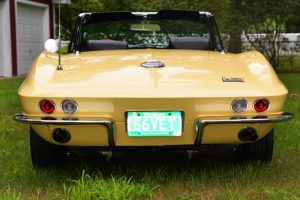
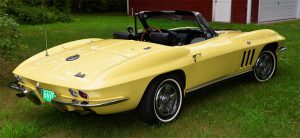
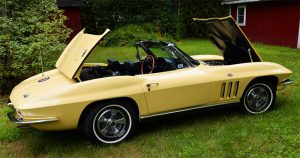
My interest in Corvettes probably started back in 1954 when some friends and I attended the General Motors Motorama Show in Boston where the highlight of the show, for me, was the fairly new Chevrolet Corvette display. However, it would be 21 years later that I would become the owner, of one of these cars.

One day a family friend, told us that a relative of his, was going to sell his 1966 Corvette convertible and asked if we might be interested. The next thing I know, the car is in our drive, with instructions to drive it a few days. This we did and after looking the car over and considering the condition of the paint and body and how badly it seemed to handle, we sent the car back and with a definite no answer.

During the time I had the car, I had rolled the driver door window down several times, the last time, the thing failed, I ended up replacing the entire assembly inside the door. (I guess you could say this was the start of the restoration of this car, though I didn’t even own it yet.) About a week later, we were on our way to the airport in Burlington, to catch a plane to Disney World with the kids. As we turned off Williston Road, parked in the lot of the gas station on the corner, was this same Corvette with a For Sale sign on it. I don’t know what sort of chemistry took place, (I think I actually felt sorry for the car, it looked like it never had any TLC) but when we arrived at the airport, I found myself in the phone booth calling the owner and telling him we would take the Corvette.

len palotta 1966 corvette stingray
Len & Jeanne Pallotta’s son Greg is shown behind the wheel of the ‘Vette.

When we returned, the long road to this year started. My first project was to get the handling, to a point, where I could at the very least, keep the car in my lane of the road. Someone had put wide Craggar alloy wheels and tires on the car, which was a misfit. I replaced them with OEM wheels and tires with original wheel covers and spinners. Wow, what a difference! Little did I know this was to be the beginning of my continuing Corvette education.

I very soon learned that mid-year Corvettes have a parking brake system that was unique to them at the time. Although this design is used on many GM models currently, back then they were not compatible with Vermont weather and when they fail, the procedure in the service manual didn’t really help. When I finally was to the inside where the working parts resided, I couldn’t believe what I found; it was one solid mass of corrosion. Thankfully, I learned of a supplier who produced these parts in stainless steel. Great, the parking brake now works but the jubilation was short lived, as I found more problems, and all went down hill from there. As I drove the car, it seemed that every couple of weeks I would have to bleed the brakes. This led to research and learning, because of the design, using solid mounted calipers with constant contact pads to rotor, plus corrosion caused by moisture absorbed alcohol based brake fluid, pumps air into the system. This required a complete disassembly of all four calipers and master cylinder, which I did, and sent them to a vender to be sleeved with stainless steel. One more problem solved, but the list continued. Over the next few years I replaced ball joints, springs, shocks, stabilizer links, all front and rear rubber bushings, rotor and pads.

1966 chevrolet corvette stingray
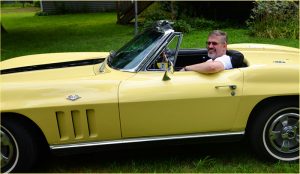
Since the very beginning the engine ran smoothly, but smoked moderately, however, eventually I detected a slight noise in the lower end. Before things got worse, I pulled the engine and transmission. It took a year to complete engine and transmission overhaul. A new radiator and rebuilding the wiper/washer, the carburetor, the distributor and the fuel pump was also done at this time.

During this one-year period, the inspection sticker had expired, so the day we completed the project, I made an appointment for an inspection. On the way a trooper stopped me for the expired sticker and gave me a ticket. It took a while but an assistant D.A. later dropped the charge.

1966 corvette stingray interior
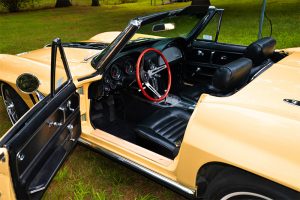
One thing that always bothered me about this car was that the electric clock never worked. So one day I took it apart and found the manufacturer’s name. To my surprise, I was able to purchase parts (at a car show). I had the face silk-screened and reinstalled it. This was great, but it made the rest of the dash look terrible. You guessed it, out came the main dash, matter of fact, out came the whole interior, seats, carpet, belts… every-thing. This was the point where we decided that we could not reinstall a new interior unless we had the body repaired and painted. Since I didn’t really have a place to do the work or the paint and my own body was now needing some restoration of it’s own, we had no choice but to have this done by an outside source. While this was being done I totally restored the seats and recovered them. In 1966 some of the options available were seat headrests and shoulder belts. These were available through Corvette restoration parts suppliers so I added these two features.

While my car was being worked on, we found the frame was very weak in some key areas, so the decision was made to remove the body and restore the frame. Again, the parts were available through suppliers.

We completed this phase of the restoration in mid May of this year (2004), as you can see, this was an on going project from day one. However, we did ,on occasion, have periods when we could drive and enjoy the car. Even when the car was off the road being worked on, we still attended Corvette shows to search for parts and network with other Corvette people to learn and exchange information. In spite of all the pitfalls, it’s been a great ride. Many thanks to my wonderful wife Jeanne, the kids Wendy and Greg, and a lot of other people, who all have either bought parts or pawed through many boxes of used parts at car shows. Thanks for just being there when I needed you for support on this project. Right now, there are left over parts still in each of our bedrooms.

Editor’s notes….

Ray Tomlinson was president in 2004 and presented the Pallotta’s with the “President’s Restoration Award” that year.

That engine that was rebuilt had the factory engine pressure gauge on the dash that was fed by a tiny plastic tube from the engine. In 1984, when Greg and his date were in high school, in formal dress on their way to an event, that tiny tube burst. The engine ceased after losing its oil. A replacement 350 Chevy engine was found and installed. The car’s proper engine is a 327 and about 12 years ago, Leonard and Greg found the engine that belonged in the Corvette. It will be going into the shop soon to make the swap.

Thank you Leonard for your story. This teaches all of us who have an old car that needs “tweaking”, to have patience….. and fun, for that short time that we are in that old car’s life. Your story is why the Vermont Automobile Enthusiasts have been around sine 1953 with a very bright future. Old vehicles keeps us all young.


1966 corvette stingray (back)  1966 corvette stingray (back)

1911 Flanders Roadster Banner

The Shelburne Museum/VAE Father’s Day Auto Festival Award…..
Most Original (Unrestored ): 1910 Flanders, owned by Vin Cassidy

1911 flanders roadster vin cassidyVin Cassidy, pictured left, has had the Flanders for a number of years. Wheel Tracks understands that Vin found the chassis and running gear in Massachusetts from Carl Weber. The body was found in Iowa some seven years ago.

Vin and his family own Cassidy Bros. Forge in Rowley, Mass. where they create some of the most amazing work you can fine. Just one example is pictured here. One of the company’s long-time employees is Al Murphy and it is also Wheel Tracks understanding that Al was the main person who put all the Flanders parts and pieces together to make what you see here.

cassidy bros forge fence
Cassidy Bros Forge Fence

The Flanders Automobile Company was around for only three years, from 1910 to 1913, while 31,514 vehicles were built. The Flanders name comes from Walter E. Flanders (1871–1923) born March 4 in Rutland, Vermont. He was educated in Vermont and left school as a teenager to begin working as a mechanic and machinist. In 1905 he obtained a contract to produce 5,000 crankcases for Henry Ford, which lead him to a production manager job at Ford for two years. Flanders left Ford in 1908 to co-found the E-M-F Company. “E” for Barney Everitt, “M” for William Metzger for “F” for Walter Flanders. EMF autos were built from 1909 to 1912 and during the three years 49,807 vehicles were built.walter flanders

Flanders died in Newport News, Virginia and is buried at Williamsburg Memorial Park in Williamsburg.

1911 flanders roadsterVin Cassidy’s Flanders has a 4-cylinder L-head engine that produces 20.3 hp and was sold for $750.00 when new. The engine has two main bearings with a splash lubrication system and a 2-speed “progressive “ transmission with cone clutch. The tires are 32X3. It is called a Series 20 Runabout and weighs about 1200 pounds with a wheel base of 100 inches.

The little car was a multi-purpose vehicle, performing duties as a passenger transporter and a delivery vehicle. The body section could be removed and replaced with a slip-on fully enclosed salesman’s body. This made it very practical for all situations.

1911 flanders runabout advertisementThe picture left is from a 1911 advertisement.

The ad below claims the delivery wagon has a carrying space of 43 by 49 inches and is built by Studebaker. The Studebaker company distributed the Flanders automobile nation wide and eventually purchased the complete Flanders Motorcar Company.


flanders gasoline delivery wagon ad